Make a whistle from scrap metal - a piece of tin from a can or other.
I had some free time over the weekend so I decided to head out to my workshop/garage and try to make something. I blew two whistles. They both have unique sounds due to slight changes in shape, but both produce clear notes. *NOTE: DO NOT use galvanized steel like I did! Zinc is not very good for you; use stainless steel, aluminum or whatever is safe (I made sure to wrap the mouthpieces with tape before using the whistle).
– Scrap metal sheets (stainless steel or aluminum) – Pliers – Tin snips – Epoxy resin (optional) – Clamp (optional)
How to make a whistle from wood
For the whistling mechanism, a freshly cut straight twig of willow or hazel, 15 cm long, 2 cm in diameter, is suitable. You will also need a sharp knife and a little free time.
- Cut vertically one end of the twig, and make a circular notch on the second.
- On one side of the stick, closer to the edge, cut the bark in the shape of the English letter - D. Tap the workpiece with a knife so that the bark comes off, then press it with your fingers and it will move off the base itself.
- From the bare rod, cut off a small rectangle at the location of the ring marking and cut off part of the wood from it - the gap for the whistle.
- Insert the resulting part into the bark case with the cut side up. Stick the remaining piece of twig into the bottom of the whistle.
- Blow into the upper hole of the tube, and with your hand, alternately raise and lower the bushing stick, adjusting the sound range. When the timbre suits you, shorten the craft.
Tip: when the bark dries, the whistle stops whistling. Soak it in water for half an hour and it will work again.
Your child liked your gift so much that he whistles as loud as he can all day long? Build a pipe using the same principle, doubling the length of the product and cutting several round holes in the bark, and listening to the music will be much more pleasant.
How to learn to whistle
There are several ways to learn to whistle without using special devices. Having mastered simple techniques, you can move on to complex ones: learn to whistle louder, play melodies, imitate birds.
Whistle intonations
There are several types of whistles.
In addition, a person may begin to whistle while thoughtful.
Whistling tunes
The lips must first be moistened; for this, use hygienic lipstick or balm. It is inconvenient to use water during the training process, since the liquid dries out quickly.
The lips are folded into a tube and pulled out. The hole should be the diameter of a pencil. The end of the tongue is lowered, a breath is taken through the nose, and then the air is continuously released through the mouth. Strong pressure is not required. If you need to increase the sound, stretch your lips slightly.
How to learn to make a loud sound
You can learn how to make a loud, sharp sound using your hands using step-by-step instructions. The sound will be louder if you wet your lips first or drink a glass of clean water.
You can use your fingers to make a loud whistle.
A diagram of how to learn to whistle loudly with your fingers:
It is possible to make loud sounds without moving your hands:
Using two fingers
The technique allows you to whistle as loudly as possible and can be used to scare away stray dogs or, if necessary, attract attention.
Before starting your workout, it is recommended to wash your fingers thoroughly.
You can whistle beautifully using a simple method:
If the whistle does not work, check the correct placement of your tongue and fingers, and slightly change their position. Continue until you whistle.
How to make a whistle out of paper
Even a kindergartener can make a paper whistle. True, the thing will be short-lived, but it will whistle a lot.
- Take a sheet of office paper and cut one third of it horizontally.
- Set aside 1.5 cm to the right and left of the wide part, draw lines and crease them.
- Fold the figure in half so that the strips folded on the sides go to the outside. Cut two triangles in the center of the fold.
- Place your lips on one triangle and blow into it, then blow into the second hole. Of course, the sounds that come out don’t resemble a whistle; rather, it looks like the purring of a cartoon mammoth looking for its mother, but the kids will like it, that’s for sure.
Homemade whistle
Now we will try to make with you the simplest wooden homemade whistle.
With our own hands, in the presence of the child, and even let him take part in the process a little. Believe me, for him to watch the process of the birth of a toy will be a real miracle! So, we need a knife and a smooth willow rod, 7-10 millimeters thick. Why willow? Because you can very easily remove the bark from a willow twig without damaging it. And this, as we will see later, is very important for us.
Willow is a plant with brittle branches, which means you don’t have to damage a living plant. It is enough just to take a walk under a willow tree after a fresh breeze to collect a bunch of branches, exactly what we need.
Step 1. Cutting a suitable rod
We select a branch with intact and even bark (this is a very important condition), if possible, without knots. Now we need to find a flat section 4-7 centimeters long on this branch. There may be buds in this area (this is common for willow), but in no case should there be any knots.
Now we cut the branch along the border of a flat area. At the other end of the section, we make a circular cut. The cut should be deep enough and lightly (just lightly) cling to the wood. To make sure that the entire layer of bark is really cut through, you can remove a ring 1-2 millimeters thick.
Step 2. “Rolling” the branch
After this, we begin to lightly “tap” the bark with a small hammer in a circle in all places. Instead of a hammer, you can use the handle of a knife. Instead of tapping, you can also “roll” the twig. This is done so that the bark subsequently peels off from the wood more easily.
Step 3. Removing the bark
We make a cutout on the branch. After this, carefully, using rotational movements, we try to remove the bark from the branch without damaging it. There is no need to rush; if the bark does not come off, you need to knock on it again and try again. In the end, it will definitely come off.
Step 4. Preparing parts
Now carefully cut off the “round piece” from the branch remaining without bark with a knife, just along the line of our cutout.
Then we cut off the round barrel.
Don’t try to cut it absolutely straight, it won’t work anyway. Yes, we actually don’t need this. If the cut turns out to be wedge-shaped, as in our picture, this is only for the better - it will be easier to regulate the sound.
Step 5. Assembling the Whistle
We insert the cut round piece into its original place, cut side up. If our cut is oblique, then we place it at the bottleneck to the hole.
Step 6. Sound Settings
Now, attention. We clamp the open end of the resulting tube and blow into it quite strongly from the side of the round. The result will be a distinct whistle. True, its timbre may not be very beautiful.
No problem, we will adjust it now.
We cut off the remaining end of the stick, insert it into the open end of the tube and move the stick back and forth to select the most pleasant timbre of the whistle. Then we cut off the protruding part of the branch and the whistle is ready!
Attention! Our whistle makes a pretty loud whistle. Therefore, the best place for exercise is a dacha or a country house, but not a city apartment.
And finally, one piece of advice. If you manage to find a willow twig with a sufficiently long section of smooth bark, 10-15 centimeters, then instead of a whistle you can make a simple pipe. It is made in exactly the same way as a whistle, but instead of selecting the timbre of the sound, simply plug the open end with a wooden stopper, and in the remaining space, make 3-4 holes in the bark, so that they can be plugged with your fingers at the same time. By opening one or another hole one by one, we can reproduce the simplest melodies. Of course, our notes will not correspond to the natural scale, but we don’t need it. The main thing is that the melody is pleasant.
How to make a mini whistle
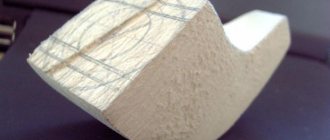
A whistle resembling a hunting call can be cut from a tin coffee or beer can. Prepare: scissors, pliers, electrical tape, nails. See the craft drawing below.
- Cut a piece of tin from a can, and from it - two rectangles, measuring 20 x 40 mm. Mark them with a nail and make them according to the template.
- Bend the wings on both sides on the first piece using a folding meter or fingers to create a 0.5 mm hole for air to pass through.
- Insert a second plate made of tin into the slot. Crimp the structure with pliers and secure with insulating tape.
- Bend the tab using a round pin.
- Close the side exits of the tongue with your fingers and whistle. Do you think the whistle is too small? Adjust the model to the desired size by increasing its parameters proportionally.
Instead of a conclusion: all the whistles presented in our selection make piercingly loud sounds, so it is better to practice whistling in nature, and not in a city apartment.
Making a whistle for a kettle: tips from professionals - Review +
A whistle for a kettle is a functional thing that determines the readiness of water for preparing hot drinks, preventing the vessel from boiling in vain. But teapots do not always have a whistle, or it can break or get lost. From our article you will learn how to make a whistle for a kettle with your own hands from various materials.
Before we proceed to the instructions for making and repairing a whistle, it is worth familiarizing yourself with the types of kettles equipped with this product.
Making a metal whistle
As a rule, such a whistle has a cylindrical shape. For craftsmen who have worked with metal at least once, it will not be difficult to make this simple device.
Progress
From a piece of metal, cut two mugs and a rectangle for the cylinder to the size of the teapot spout.
Then we solder the parts together. The whistle is ready!
Whistle from a cork
Making a whistle from a tin cork is very simple. You will need to connect two plugs together and make a 3mm hole in them.
Important: between the plugs, you must place a small metal cylinder.
From a toy whistle
For teapots with a thin spout, a children's whistle option is suitable. Due to its small size, it is completely adjacent to the surface of the spout. If the kettle has a wide spout, then a metal cup can serve as the basis for the whistle; use a metal drill to make a small hole.
Important: in order for the whistle to serve for a long time, it is necessary to choose high-quality materials for its manufacture. We advise you to give preference to corrosion-resistant materials. For example: zinc, copper or galvanized. Not suitable: plastic, aluminum, materials that cannot withstand high temperatures.
What to do if the whistle is broken?
There are several reasons why a whistle may malfunction. To begin with, we recommend that you use a screwdriver to remove the product and try to blow it out yourself. If the whistle works, it means the kettle itself is faulty. If not, then it's on the whistle.
Reasons, malfunctions of the whistle - the product could become clogged, melt, or bend. If the defects are minor, try to fix them yourself. If this is very difficult to do, it makes sense to make a new whistle.
Causes and malfunctions of the kettle:
How to repair a whistle?
In most cases, the breakdown is easily fixed. For example, in cheap models the most common problem is the inner plate falling out due to poor quality welding. It's easy to fix this problem.
Using a screwdriver, remove the whistle, remove the spring located under it, then clean the surface using sandpaper. Solder the fallen part. Then we sand it again and neutralize the soldering acid using alkali.
As you can see, making a whistle for a kettle with your own hands is very simple. And if you make it from high-quality material, it will serve you for a long time.
Branch selection
It is best to make a whistle from brittle ones. But you should not destroy a living tree. Many branches can be collected next to it. Twigs no thicker than one centimeter are best suited. You can easily remove the bark from them with a knife.
Having collected enough branches, you should choose the only one from which you will make a whistle. To do this, find the most equal branch without knots or damage. Just 5-8 centimeters of a clean and level area on the branch will be enough. Pay attention to the bark: it must be perfect. The presence of kidneys will not be a hindrance - they can simply be removed.
After selecting a branch, you can cut off the excess part on one side until the smooth section begins. Having measured 5-7 centimeters from it, we make a circular cut. You will get a slot that resembles a ring. It should not be too deep, just cutting through the bark, touching the wood, is enough.
Reasons for the absence of whistle
A fairly common problem that happens with such cookware is the breakage of the whistle.
You can repair it yourself, since the mechanism is very simple.
First of all, you need to understand the cause of the breakdown. To do this, remove the whistle from the spout of the cold kettle and try to blow into it. If a whistle appeared, trouble happened to the kettle itself. If it is not there, then the problem is with the whistle - it is broken. If the whistle falls off, it is advisable to buy a new one - they are sold separately.
Repair process
Straighten the bracket into a corner. Break off the ends that are too long.
We put the blank on the ring. We bend the ends of the wire.
Using pliers, we push the curved ends deeper into the hole in the whistle body.
Ready!
The whistle fits perfectly in the new loop. Still active and vocal!
Making a pipe with your own hands
Monday, March 2, 2022
Once upon a time, almost every boy knew how to make the simplest musical instruments with his own hands: drums from pharmacy bottles, voice instruments from an ordinary hair comb, and wind instruments from ubiquitous plants. Let's remember how you can make various pipes with your own hands?
What kind of musical instruments people made with their own hands: petrophones (a percussion instrument made of stones), pipes from medicine bottles, percussion from tea glasses and paper tubes, drums from leather-covered pots, and of course, all kinds of pipes and pipes. The art of making these instruments is gradually being forgotten, so let’s leave here a few recipes for memory:
Common pipe
A simply constructed pipe can easily be used both in a solo version and in a whole orchestra of homemade instruments.
To make such a pipe you need to find a straight line. an even stick 20-30 cm long and 2-3 cm in diameter. An elderberry stick is best suited, since it has a soft core that can be easily removed with thick wire. If you come across a stick in which the soft core occupies only a small space, and most of it is occupied by hard wood, the hole in the tube is expanded with a thin metal rod heated over a fire. At one end of the tube, retreating about 2-3 cm from the edge, a large oval hole is cut, as is usually the case with whistles. A small cylinder 2-3 cm long is cut out of wood (the thickness of this piece must be calculated so that it fits tightly into the tube, and its length must be taken such that its lower edge is just above the hole). Before inserting the cylinder into the tube, it is cut off from the side by approximately a millimeter. Thus, this part becomes on one side not round, but flat, and if it is now inserted into the tube (with the flat side facing the cut hole), then a gap will remain between the wall of the tube and the cylinder. If you put the tube to your lips and blow into this gap, the pipe will make a sound.
All that remains is to burn out the frets with a hot nail - small (about 0.5 cm in diameter) holes. The distance between the frets is 2-3 cm. Six frets need to be made.
When playing, the pipe is taken in both hands, and its frets are covered with the fingers. By opening one of the frets or several at once, you can get tones of different heights. After a little practice, you can easily pick out simple melodies on this instrument by ear; It is only important to remember the combinations that produce this or that tone.
Reed nozzle or bagpipe
Nozzle - a very simple tool that was once very popular among shepherds is well known by this funny name. It is not difficult to make such a nozzle.
A straight tube about the length and thickness of a pencil is cut out of dry reeds or reeds. Both ends are carefully sharpened with a penknife (as an option, you can use a file). At one end of the tube, retreating 1-1.5 cm, a small transverse slit is cut with a sharp knife.
From the ends of this slit, two parallel longitudinal cuts, three centimeters long, are made downward, so that a tongue is formed on the tube. The tongue is carefully sharpened with a knife and made as flexible as possible. The very base of the tongue needs to be sharpened especially well.
If you now take the tube so that almost the entire tongue is in your mouth, and then, tightly closing the upper hole with your tongue, begin to blow air into the tube, the nozzle will begin to make a rattling sound, vaguely reminiscent of the sound of an oboe. |
All that remains is to drill or burn three or four frets in the tube (holes spaced 2 cm from each other), and the instrument is ready.
Tuning the nozzle is done by shortening the tube until its fundamental tone (the sound that the tube gives when all the fret-holes are closed with the fingers) exactly matches any arbitrarily chosen “pure tone” of the scale.
To amplify the sound, you can attach a small horn made of cow horn, birch bark rolled into a cone, or simply paper to the bottom of the nozzle. If you make a nozzle with 5-6 frets (holes) and practice playing it, you can learn to extract a fairly large number of tones from this simple instrument.
Angelica pipe
In our forests you can often find a plant from the umbrella family, colloquially called “angelica” (angelica officinalis). Its trunk is round, straight and empty inside. At the top, angelica ends in many small white flowers arranged in the shape of an umbrella. This plant looks somewhat like dill.
The trunk of the plant is trimmed at the base with an oblique cut. The same cut is used to remove the flower umbrella. The result is a tube beveled at the top and bottom. At the upper end, retreating 1-2 cm from the edge, a small oval hole is cut.
If you take the upper end of the pipe into your mouth, close the lower hole with your finger, insert the tip of your tongue inside the tube just above the hole and blow, the pipe will begin to make a sound slightly reminiscent of the sound of a bassoon. Three or four frets (holes) are drilled on the front surface of the pipe. This instrument adapts to the orchestra in the same way as a nozzle—by shortening the tube.
Tags: Fine crafts, Useful practical skills