Share on social media networks:
In summer, it is better to wear bright and attractive outfits to attract the admiring glances of others. From this article you will learn how to sew a blouse from scarves and many other things from this material. You can believe that such an outfit will definitely not leave you unnoticed. The peculiarity of making clothes from purchased scarves is that you don’t need to make a pattern at all. Even a girl who has never picked up a needle and thread can sew such a product - for this work she will need only 2-3 hours of time. Silk scarves can be used to make not only blouses, but also original dresses and tunics - silk products will look very beautiful while walking along the beach.
Method 1
For further work you will only need:
- Two scarves (preferably silk) - the sizes should be large enough.
Important! The colors of scarves can be the same or contrasting - it all depends on your taste.
- Chains that will be used as straps.
- Sewing machine.
You can make a dress or blouse from scarves yourself by following a simple procedure:
- Take the prepared materials.
- Make two holes at the top of each scarf and thread the prepared straps through them.
Important! The holes need to be made, slightly moving from the center of the silk fabric to the desired edge.
- Place both halves of the blouse together and sew the side seams.
The blouse is ready!
Important! It is better to wear such an item of clothing and decorate it with a neat belt that matches the design of the pattern on the scarves. It is better to fix the free edges of the product at the back - this way your image will look neater and more feminine.
Sewing from round fabric
Making a cape from a round piece of fabric will be a little more difficult due to the processing of the rounded edges. A novice needlewoman will be able to correctly sew a poncho with a pattern. A quarter of a circle is drawn on paper, the total radius of which is 60 cm, while the diameter of the neck will be 30 cm, and the length from it to the edge of the cape will be 45 cm.
With these values, the poncho will be shortened and will reach the waist. The length of the product can be changed by increasing or decreasing the corresponding pattern line.
To make a round poncho, you need a fabric that drapes well. Fleece would be a great solution. The material is purchased in size 120x120 cm. The fabric is folded in half. A pattern is applied to the panel and a semicircle is outlined. The workpiece is cut out using scissors. Then an additional incision is made into which the head should fit freely. The edges of the product are processed using a machine or overlock. Then they decorate the neckline and sew on the clasp. If desired, the cape is decorated with decor.
Method 3
You don’t need to make a pattern for a blouse from scarves with your own hands here either. In the end, you should end up with a dress that can be shortened to fit a blouse, or you can leave it as is.
For further work, prepare the following materials:
- Two large square silk scarves.
- Two small scarves of the same material.
- Sewing machine.
The following work consists of three stages:
- Blouse. Place the scarf at an angle, tuck it inward and sew a ribbon on the wrong side.
Important! If necessary, you can lengthen a piece of fabric by cutting off part from the bottom and sewing it partially onto the back - this will make the product easier to tie at the back.
- Skirt. Fold the corner inward, sew a ribbon on the wrong side, and the same manipulations must be carried out with the second fabric. On one side, the scarves need to be combined by stitching them, and on the other, buttons must be sewn on. Your DIY scarf skirt is ready.
Important! To make the product asymmetrical, one of the scarves can be moved from the center line.
- Belt. Next, you need to roll the scarf into a triangular shape, then bend it again so that you get a wide strip. Later, if desired, it can be stitched so that it does not lose its shape.
Five options for making a blouse from a scarf
Option 1.
To make such a colorful and bright blouse you will need two square silk scarves. Shawl fabric should be dense and not transparent. A model with an open back is good for beauties with a model appearance.
Progress:
- Fold the scarves diagonally, lay them close to each other with the long side.
- In the middle (see photo), tie the scarves, you can pin them to each other with a beautiful brooch or decorative pin.
- Bring the upper ends of the resulting structure to the back of the head and fasten them with a knot.
- Bring the tops of the triangles back and also tie them at the waist with a knot.
- The lower ends fall freely down.
Option 2.
A scarf tied in this way is perfect for a summer walk. Pairs beautifully with white trousers.
Progress:
- Fold one corner of the scarf, this will be the side that will go under the armpit of one of the sides.
- Place the folded side of the product under either arm, and tie the free ends of the scarf on the opposite shoulder.
- Move the fabric so that the knot is near the shoulder blade.
- Then proceed at your own discretion. You can bring the product to its logical conclusion by tying a second scarf, folded into a wide belt on top of the first, carefully tucking the lower part of the blouse under it. The second option is to tie the lower ends together and place them on your back.
Option 3.
An easy and quick way to build something fresh and extraordinary for a trip to nature.
Progress:
- Fold the scarf in half.
- Cross the top corners and tie at the back of the head.
- Place the lower ones on your back in the same way and secure them with a knot.
- The blouse is ready.
Option 4.
A democratic outfit of two rectangular scarves, suitable for a walk and visiting a summer cafe.
Progress:
- Place the two cuts together. Tie the top corners together with beautiful knots.
- Throw knitted scarves over your shoulders.
- Take the strap and tighten it at the waist over the structure.
- Straighten out all the folds. The long blouse is ready.
Option 5.
This tying option can easily replace the top of a swimsuit and is also suitable for young and daring beauties.
- Progress:
- For this model you will need two identical fabric squares and two braids or ribbons made of the same material as the scarves.
- Tie the corners of two scarves as shown in the picture.
- Tie or sew a piece of braid to the upper corners of the structure.
- Place the scarves on your chest and tie the braid around your neck.
- Bring the ends of the scarves to the back and tie them in a knot.
- Ready.
Method 4
Now let's try to make a piece of clothing that can be used both as a blouse and as a dress.
Materials for making a garment:
- Two identical large silk scarves.
- Sewing machine.
- A belt that matches the color of the material design.
The work itself is very simple and consists of just two simple steps:
- Fold the prepared materials and machine stitch them along the shoulder line.
- Sew side seams.
The dress is ready! All that remains is to choose the appropriate belt for the product.
Straight dresses made from two scarves
Dress 1
Make 2 side seams, and turn the top edge of both scarves 3-4 cm. Thread a braid, cord or thick chain, which is currently in trend, into the drawstring. It will take 80-85 cm.
But for these three dresses, the side parts are sewn the same way, and the neck is the same as in the next pattern.
Dress 2
Lay out 2 scarves, back to back, in front of you. Fold the edges of the bottom scarf towards you, leaving about 30 cm between the folds for the neckline. Sew 2 short seams on the shoulders. Sew the side seams along the edge of the scarves or as in the previous dress. This dress, made from Pavlovo Posad scarves, can be worn even in winter.
Method 5
Before sewing a blouse from scarves, you need to prepare the following items:
- Two scarves in delicate colors.
- Safety pins.
- Scissors.
- Sewing machine.
- Tape measure.
The essence of the work is as follows:
- Fold each piece of prepared material in half.
- Use safety pins to mark where the center of the panel is.
- Mark the width of your shoulder on each piece of silk.
- Pin two fabrics along the marked shoulder line. The overlap should be at the front.
- Measure and sew the panels by hand along the shoulder line.
- Measure the distance from the edge at the bottom of the square to your waist.
- You can also sew scarves with your own hands.
The blouse is ready!
Important! It is better to wear such a product with a wide, or, conversely, narrow belt.
Pattern of a Russian sundress for an adult
The drawing of women's items, unlike children's items, is more complex. It is better to do it taking into account the individual characteristics of the figure.
How to take measurements of a woman correctly
To create a pattern, you need the following measurements - chest volume and back. You won't be able to take measurements yourself. It is better to invite some assistant for these purposes. During measurements, the woman should stand straight and not slouch. The volume of the chest is measured by the most protruding point on the chest and the protrusion of the shoulder blades on the back. The measuring tape should lie freely. You can also measure the width of your chest and the width of your back. In this case, measure the distance from the armpits at the widest point of the chest. Then do the same from the armpits, only along the shoulder blades.
Building a pattern of a Russian folk sundress for an adult
A women's product will consist of several parts. Moreover, when constructing a pattern, it is better to take many heights according to your personal preference. A certain sequence should be followed when constructing a pattern:
- First, parts of the back and shelf are drawn. The width is taken as the width of the chest and back, respectively, and the height is approximately 10 cm.
- An indent of 0.5 cm should be made from each lower edge of the back and shelf, thereby slightly narrowing the part.
- The straps are drawn in size 30x8 cm (their length is specified during fitting).
- Next you should draw two trapezoids for the hem. Their size is determined taking into account the desired length of the future product. The width of the upper base should be varied. For example, the back of the canvas should be 5 cm larger than the width of the back, and the front by 8 cm.
- For each pattern element, you need to add a seam allowance of about 1.5 cm.
- The patterns are signed and the direction of the grain thread is indicated on them.
- The final stage is cutting out the resulting drawings.
How to tie a scarf on your head
Scarf in the image of the Virgin Mary.
Turban scarf.
In the style of "Hollywood"
This style of wearing a headscarf has been remembered by women since the prosperity of Hollywood. Advanced fashionistas will definitely wear a headscarf a la Hollywood, just like famous beauties: Sophia Loren, Audrey Hepburn, Grace Kelly... The look is suitable for stylish, sophisticated ladies who want to emphasize their grace. The scarf looks incredibly graceful with glasses.
How to sew a poncho coat
A poncho can be used not only as a cape, but also as a coat. The product can be sewn from any warm material. For the cold season, drape is the ideal choice. To make it you will also need a leather clasp with a buckle. Rivets or rhinestones will decorate the coat. You should choose those accessories that are attached to the material with teeth.
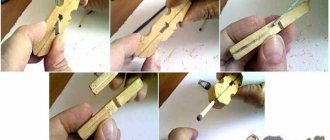
Poncho making plan:
- First, determine the length of the product (D1) and the length from neck to wrist (D2).
- The fabric sheet is folded in half. To prevent the material from moving out, the sections are secured with pins. From the fold of the fabric, using a chalk, draw a circle with a radius equal to D1.
- Excess material is cut off using scissors. The canvas is unrolled once so that it forms a semicircle.
- A neck is cut out in the center. You can use a T-shirt by attaching it to the canvas.
- Using chalk, draw a straight line from the neck to the middle of the bottom edge and cut the top layer along it.
- Measure D2 from the edges of the neck to the right and left, making marks with chalk. If this distance from the neck to the wrist is less than the length of the product, then draw a smooth transition from the bottom to the marks and cut off the excess material. You can make cuts along the fold of the fabric at the top and front of the product, then the arms will look out to the elbows.
- Then all edges and cuts are decorated with bias tape.
- Special glue is applied to the ends of the fastener and attached a few centimeters below the middle of the neck. The fastener should be secured with a pin until the glue dries.
Stylish and practical: scarf with jacket and coat
If the weather is cold, you should definitely wear a scarf instead of a headband or hat. With a classic-style jacket, the “granny” and “Hollywood” options look great. Bold trendy twists (parka and biker jacket) look appropriate with a scarf turban.
Speaking of a scarf for a coat, it is worth noting that the above options are suitable. You can wear a stole. This accessory allows you to create masterpiece images for any occasion.
Be irresistible and remember that even the smallest accessory is capable of big things!
Ways to turn a stole into a cardigan
By changing just a couple of details in the stole, you will get an unusual piece of clothing made by yourself. Below are a few ideas on how you can turn an ordinary scarf into a cardigan without much time and money.
Sew buttons on front
You will need 2-3 identical medium sized buttons. Place the stole over your shoulders, align its edges in front and mark the places where you would like to sew buttons. On one field, punch the loops and finish the edges, and on the other, sew buttons at the same level.
Option: instead of buttons, you can use a large decorative pin or a special loop for fastening.
For this and the following options, it is better to use a wide and long stole so that the final result suits you and is the right size.
Add a strap
Here we can offer two options: for the lazy and not so lazy:
- if you don’t want to or don’t have time to reshape and sew, then simply dilute the look with a waist belt. Throw a warm stole over your shoulders and tie it around your waist with a stylish leather belt with a large buckle. In this look you will definitely not go unnoticed;
- You can complicate the task a little and make an unusual cardigan-vest that looks great with a strap . To do this, make two slits for the arms in a wide scarf. Before you start, of course, carefully measure exactly where to make the slits so that the future item is not too small in your back. If you can, carefully finish the edges by hand or on a machine. Wear such a vest with a warm turtleneck and be sure to have a belt at the waist: this way the image will look current and complete.
A very warm and beautiful idea for those who don’t like fasteners. To do this, make a slit in the middle of the scarf so that you can put your head through. To cut it exactly in the center, fold the fabric in half . On the side where the front of the product will be, widen the cutout by about 5 centimeters. Don’t forget to overcast the edge of the neckline, this way the item will last longer and will not fray.