Learn to make cute crafts with Winnie the Pooh with your own hands
In this master class it is proposed to make a fairy-tale character from plasticine. The complexity of this work is not high, so this craft can be made with children in the middle group of kindergarten. The same technique can be used when sculpting from polymer clay or even mastic.
You will need:
1) Plasticine of different colors;
2) Stack and board for modeling;
1) First of all, prepare the plasticine for work, thoroughly kneading it, turning it into a soft and pliable mass. Then we form brown balls of two shades from the blocks. A darker color can be achieved by mixing brown and black clay until the color is even.
2) Then make a sausage from a light brown ball, which we divide in half. We give the new parts the shape of a ball and connect them to each other. This is the head and body of the future bear.
3) Give the desired shape to the head. To do this, use a stack to press the upper part of the ball and form a semicircular muzzle.
4) Then from a piece of dark brown plasticine we roll a small ball, which we turn into a sausage. Next, give it an arched shape and flatten it. We attach the resulting part in the upper part of the head above the protruding muzzle.
5) From small balls and sausages of both brown colors we form ears, which we attach to their proper place. Gently press one of the ears with a toothpick.
6) We make indentations for the eyes, into which we then insert white plasticine cakes. We attach black pupils on top. We form a nose from the same plasticine and fix it in place.
7) We form the paws from dark brown plasticine. We divide it into four parts, from which we sculpt oblong droplets. We attach the bear cub to the body.
We make a mouth and paws with a stack, sculpt eyebrows from black plasticine.
9) The final touch: make a balloon by attaching a circle of blue plasticine to a toothpick. We insert Winnie the Pooh into his paws.
Children's master class in mixed media execution "Winnie the Pooh's Gift"
Lyubov Fedotova
Children's master class in mixed media execution "Winnie the Pooh's Gift"
To work you will need:
— a picture of Winnie the Pooh ;
- cardboard of any color;
- threads of any color.
Completing of the work:
We cut out a figurine of a bear cub.
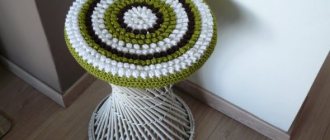
The circles were filled with plasticine of different colors using the plasticineography technique .
We placed threads on each ball and secured it on top with a piece of plasticine of the corresponding color.
The threads were collected together in one place.
They coated the bear cub with glue and practically put strings of balloons into the bear cub’s paw (covered it with the paw)
.
Our craft is ready, and Winnie the Pooh is ready to give balloons .
And this is the work of the guys
Thanks to all colleagues for your attention and support.
Application “Photo of Winnie the Pooh” in the senior preparatory group Abstract of NOD Educational field artistic creativity application “Photo of Winnie the Pooh” (for children 5-6 years old) Conducted by teacher: Stegacheva.
Summary of GCD on the topic “Honey” in the second junior group “Gift for Winnie the Pooh” GCD on the topic: “Gift for Winnie the Pooh” Educational objectives: to form an idea of the varieties of product useful for humans.
Master class on applique from cotton pads in mixed technique “Hares in winter” in the middle group Master class: applique from cotton pads (mixed technique) “Hares in winter” in the middle group Goal: To develop fine motor skills of the hands, develop. Master class for mothers and children “Postcard for dads on February 23” in mixed media in the second junior group Before the holiday of February 23, we held a master class in the group with mothers, grandmothers and children. Everyone made voluminous postcards on it. Master class on drawing in mixed media “Polar Bear” in the senior group Master class on non-traditional painting technique “Polar Bear” in the senior group Purpose: To foster creative activity, independence,.
Joint lesson between parents and children on health conservation “At Winnie the Pooh” Joint lesson between parents and children on health conservation “At Winnie the Pooh” Educator Zakharova Olga Gennadievna Joint lesson between parents.
Tutorial on making Winnie the Pooh from salt dough for beginners
This craft can be done with children in the older group of kindergarten. Modeling from salt dough perfectly develops hand motor skills and helps awaken creative abilities.
You will need:
2) Cold water in a glass;
3) Kinder surprise egg;
4) Board and stack for modeling;
5) Brushes and paints.
1) First, a dough is formed, which consists of water, flour and salt. The last two ingredients are added in a 2:1 ratio.
2) From the resulting mass we form a round plate of small thickness, lubricate it with water and wrap it around a plastic egg.
3) Then we form a sausage, the thickness of which will be 1 cm. We divide the workpiece into eight identical parts, from which we then roll into small balls.
4) Place the plastic egg blank on the base. At the bottom we attach two balls that will be Winnie the Pooh's legs. We make fingers using a stack.
5) Roll the other two balls into sausages, forming the upper legs, cutting through the fingers. We attach it to the body. From another ball we make a pot of honey, giving it the required shape using a stack. We attach it between the upper paws, adding a drop of honey.
6) Next, we form the muzzle and ears, then gluing them to the right places. We cut out the mouth, and also make small balls that will be the nose and eyes. We attach all the parts, remembering to use water.
7) We paint the fairy-tale character with bright colors and enjoy the result.
Master class on making a soft Winnie the Pooh toy
Next, let's look at the step-by-step description of the process of sewing a soft bear. It is best to use short-pile fur in this work or make a craft from felt.
You will need:
1) Selected material;
4) Needle and thread;
Manufacturing stages:
1) The necessary parts are cut out according to the patterns and their insides are sewn together using a seam over the edge. The first step is to close the darts, indicated by dotted lines. The front and back of the head are then sutured, leaving a small hole at the bottom.
2) The workpiece is turned inside out, the junction of the ears and the head is stitched. The head is stuffed with the selected material.
3) Next, the cut out part for the muzzle is bent along the dotted lines, and the darts are sewn together. It is stuffed and sewn into place to the head. Eyes and a nose are cut out and glued from the skin, and a mouth is sewn on.
4) The front parts are sewn together, ensuring that the letters B and C indicated on the pattern match. The seam should be in the middle.
5) The blanks for the back are sewn together, leaving an open hole in the neck area through which the part is turned inside out. The frame is inserted inside and filled with filler. Then the head is sewn on using a hidden seam. 6) The paws are sewn in pairs, stuffed and attached to the body. The ends of the frame are inserted into the stitched parts of the lower limbs, the parts are stuffed and also sewn to the craft.
Crafts from thermomosaic Winnie the Pooh and everything, everything, how to make it yourself?
You can create a variety of products, crafts and toys with your own hands from thermomosaics. One of the great themes is Winnie the Pooh and his wonderful friends like Piglet, Eeyore, Owl, Rabbit, Tigger, Kanga. They can be made from thermomosaic.
Crafts made from thermomosaics are placed on the surface of the tablet, stringing beads onto the spikes of the tablet and creating a pattern. The finished craft should be ironed using an iron. This way all the parts will stick to each other and all the beads will turn into a single product.
To make the drawings realistic, you should use ready-made diagrams. You can see them here, as well as ready-made crafts based on some of the schemes.
Creating crafts from thermomosaics is a useful activity and creates a favorable mood, distracts, develops, and has a positive effect on concentration and memory. That’s why it’s so important to work with children so that they are interested in creating cartoon images from beads.
- Although adults can also do such crafts.
- With Winnie the Pooh and his friends you can make badges on clothes and bags, key rings, buttons, thermomosaic dishes with a pattern, jewelry, etc.
- Winnie the Pooh for Halloween:
LiveInternetLiveInternet
- Registration
- Entrance
—Links
-Music
—Categories
- Beauty and personal care (120)
- beauty and care (80)
- hairstyles (21)
- fashion and style (19)
- Health (118)
- Painting, beautiful pictures, photos, illustrations (22)
- Animals, birds, insects (5)
- Cooking (785)
- salads (115)
- snacks, sandwiches (69)
- vegetable dishes (32)
- fish dishes (39)
- meat dishes (39)
- poultry dishes (32)
- minced meat dishes (14)
- mushroom dishes (6)
- pizza (17)
- casseroles (20)
- buns, buns (38)
- pies, pies, rolls (112)
- cookies (41)
- cakes, pastries (91)
- winter preparations (43)
- desserts (28)
- cocktails, drinks (17)
- wine, liqueur (11)
- food decoration (22)
- Crochet (376)
- toys, clothes for toys (124)
- for women (102)
- for children (101)
- for home (44)
- crochet lessons (2)
- Knitting (281)
- for women (153)
- for children (60)
- socks, mittens, gloves (23)
- toys (15)
- for home (15)
- for men (14)
- Embroidery (84)
- paintings (44)
- for the kitchen (20)
- pillows (12)
- cards, bookmarks (8)
- Sewing (202)
- toys, clothes for toys (78)
- for women (52)
- miscellaneous (25)
- for home (18)
- for children (18)
- alterations (10)
- for men (1)
- Child development (289)
- teaching mathematics (71)
- speech development (60)
- writing, fine motor skills (46)
- let's explore the world (29)
- logical thinking (27)
- diploma (17)
- finger games (11)
- reading training (9)
- riddles, proverbs, sayings (1)
- attention, memory, imagination (15)
- Educational games for children (124)
- Do-it-yourself development kits (20)
- Crafts with children (219)
- made of paper (74)
- applique (37)
- origami (29)
- salt dough (19)
- for the holiday (19)
- made of plasticine (19)
- made from natural materials (11)
- crafts from waste material (9)
- Coloring pages (56)
- Drawing with children (53)
- Reading with children (32)
- Tips for parents (27)
- Everything for the teacher (91)
- thematic, educational cards (40)
- demo material (32)
- group and hall decoration (10)
- medals (7)
- certificates (2)
- For school (23)
- Cartoons (46)
- educational cartoons (22)
- Cinema (81)
- Music (35)
- Poems (66)
- Proverbs (25)
- Audiobooks (24)
- Video collection (25)
- Beginner photographer (22)
- Travel (78)
- virtual travel (57)
- active recreation, vacation (21)
- Pets (12)
- Indoor flowers (24)
- Garden flowers (19)
- Landscape design (18)
- Interior (38)
- Useful tips (102)
- various (45)
- for the kitchen (33)
- for the garden (dacha) (12)
- care of clothes and shoes (11)
- Computer (81)
- lessons/usefulness (53)
- programs (27)
- Gift ideas (37)
- Holidays (15)
- Links (63)
- For a diary (123)
- lessons/usefulness (56)
- frames (33)
- buttons - transitions (15)
- dividers (13)
- Humor, jokes (29)
—Applications
- Postcards
Reborn catalog of postcards for all occasions - I am a photographer
Plugin for publishing photos in the user's diary. Minimum system requirements: Internet Explorer 6, Fire Fox 1.5, Opera 9.5, Safari 3.1.1 with JavaScript enabled. Maybe it will work - always no analogues at hand
^_^ Allows you to insert a panel with an arbitrary Html code into your profile. You can place banners, counters, etc. there - Wall Wall
: mini-guest book, allows visitors to your diary to leave messages for you. In order for messages to appear on your profile, you need to go to your wall and click the “Update” button
—Search by diary
—Subscription by e-mail
—Interests
-Friends
— Regular readers
—Communities
-Statistics
Application made of plasticine and cereal “Winnie the Pooh” for children 5 years old
What to do with your baby in your spare time? The little ones are always trying to get into trouble somewhere or break something. But they didn’t do it on purpose! Children at this age are especially inquisitive. A million questions arise in their little heads: “what” and “why”? Sometimes not every adult will give the correct answers to them. Enjoy your time! Channel your unbridled children's energy in the right direction! Offers you an idea for creating a funny Winnie the Pooh out of plasticine and cereal. This application is for children aged 5 years.
Applique at the age of 5 is an incredibly useful type of needlework. The child develops his imagination and logical thinking, hand motor skills, and learns to work with various materials. Both you and your baby will get a lot of positive emotions from such time together. And how delighted grandparents will be with such a gift!
What a cute applique you can make!
To create such a picture we will need:
cereals (in this case, buckwheat and millet are best)
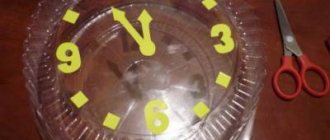
1. Print out some funny picture from the computer. If you don’t have a computer or printer, you can draw by hand or translate a drawing from children’s books.
2. Apply and roll out plasticine to individual parts of the body. For this picture it is better to use brown and yellow.
This picture also looks good, but we will not dwell on this and will complicate our task. Let's cover the application with cereal.
3. To ensure that the cereal sticks well, cover the image with glue.
4. Sprinkle the bear’s body with millet and the shirt with buckwheat. And wait until it dries completely.
Let's add a frame and that's it! The picture is ready.
| Categories: | Crafts with children/applique |
Tags:
applique of cereal and plasticine Winnie the Pooh for children 5 years old
Cited 20 times Liked by: 6 users
DIY Winnie the Pooh from plastic bottles | Crafts for the garden
DIY Winnie the Pooh from plastic bottles | Crafts for the garden
Probably each of us remembers the kind and interesting cartoon about Winnie the Pooh and Piglet.
These funny characters have gained popularity among both children and adults. I really like this funny little bear who loves honey and visiting))). Tatyana Ladanova also could not resist this fairy-tale character and decided to make this cute fairy-tale bear cub on her site and shared with us the process of making it. First, we will look at a master class on making Winnie the Pooh from plastic bottles and papier-mâché, and in another article we will talk about how to make a Heel with your own hands. From the materials available to us, we will make a charming Winnie the Pooh into our garden. You can also place it on the playground; children will definitely love it and become their best friend. I advise you to look on the website in the section CRAFTS FROM BOTTLES, where you can find many other interesting fairy-tale characters. To make Winnie the Pooh we will need: * 1.5 liter plastic bottles. * Plastic bottle 5 l. * Canister 5 l. * Bags. * Scotch. * Newspaper. * Plywood. * Liquid Nails. * Toilet paper. * Glue.
Method for making Winnie the Pooh: Let's start making it, first we will make a barrel of honey for our Winnie the Pooh and put him on the barrel. After all, the main thing our Winnie the Pooh has is his pot of honey. We will make a barrel from plastic bottles. We take plastic bottles of the same size and secure them with tape.
This is how you should succeed.
Next, take newspapers and wrap them evenly around the plastic bottles and secure them well with tape.
Now we need a circle of plywood and 5 liters. plastic bottle. First we fix the plywood or anything else that is on the barrel and then we fix the bottle on top. We attach the plywood with screws to bottle caps.
Now we need to compact the body. Tatyana used bags, she used them to add volume and then secured them with tape. We need to make a head on top. Take 5 liters. canister, cut it down to the handles, leaving a little space from the handles for ease of fastening.
Learn to make cute crafts with Winnie the Pooh with your own hands
Made from plasticine.
In this master class it is proposed to make a fairy-tale character from plasticine. The complexity of this work is not high, so this craft can be made with children in the middle group of kindergarten. The same technique can be used when sculpting from polymer clay or even mastic.
You will need:
1) Plasticine of different colors;
2) Stack and board for modeling;
1) First of all, prepare the plasticine for work, thoroughly kneading it, turning it into a soft and pliable mass. Then we form brown balls of two shades from the blocks. A darker color can be achieved by mixing brown and black clay until the color is even.
2) Then make a sausage from a light brown ball, which we divide in half. We give the new parts the shape of a ball and connect them to each other. This is the head and body of the future bear.
3) Give the desired shape to the head. To do this, use a stack to press the upper part of the ball and form a semicircular muzzle.
4) Then from a piece of dark brown plasticine we roll a small ball, which we turn into a sausage. Next, give it an arched shape and flatten it. We attach the resulting part in the upper part of the head above the protruding muzzle.
5) From small balls and sausages of both brown colors we form ears, which we attach to their proper place. Gently press one of the ears with a toothpick.
6) We make indentations for the eyes, into which we then insert white plasticine cakes. We attach black pupils on top. We form a nose from the same plasticine and fix it in place.
7) We form the paws from dark brown plasticine. We divide it into four parts, from which we sculpt oblong droplets. We attach the bear cub to the body.
We make a mouth and paws with a stack, sculpt eyebrows from black plasticine.
9) The final touch: make a balloon by attaching a circle of blue plasticine to a toothpick. We insert Winnie the Pooh into his paws.
How to make Piglet from plasticine - the hero of the cartoon about Winnie the Pooh - with your own hands step by step
Print Thank you, great lesson +3 To sculpt Winnie the Pooh's most faithful friend, we must remember the lessons on sculpting a regular pink pig and Peppa Pig. Yes, you already guessed that we are talking about little Piglet, who accompanied the glutton bear everywhere. You can come up with different ways to create your favorite character - draw it, make it out of paper or felt, but we suggest you use plasticine, which will allow you to create a three-dimensional, moving toy. Other lessons on the theme Winnie the Pooh:
The main colors of plasticine for work are blue and pink. Blue will be needed for sculpting the pig's overalls, and pink for the exposed parts of the body. If pink seems too bright for you, dilute it with white or even add a drop of blue to tone it down.
Roll the pink ball and prepare two small pink pieces to create the ears.
Draw out the ears and attach to the round head.
Stick a patch on the muzzle - a round piece of brighter pink plasticine, two pink cheeks and a dot on the mouth.
Glue blue eyes immediately above the patch.
To make Piglet's plump body, roll a ball of blue plasticine. Next, pull the soft white mass into thin threads and apply it to the blue ball in the form of a mesh.
Stick blue cakes to the bottom as legs, and a pink cake to the top, continuing the torso.
Attach the ball to the head, making a neck (in this case it is better to use a match).
Add pink legs with black hooves, also sticking them onto the matches.
Attach thin arms to the body, making them in the same color scheme as the legs.
Now Piglet made of plasticine is ready to go for a walk, for honey or to visit his best friend Winnie the Pooh.
Print Thanks, great lesson +3
Dough is not just for the kitchen
What we'll get to now is sculpting. Namely, for modeling from salt dough. It is generally accepted that this type of needlework develops hand motor skills well, and also awakens creative ideas, capabilities and talents. First of all, you need to mix the dough.
For this we need flour, salt and 1 glass of cold water. The proportion of flour and salt is 2 to 1.
Our dough is ready. Now let's take the rest necessary for modeling, namely:
- Egg from Kinder Surprise;
- Modeling board;
- Stack;
- Tassels;
- Paints.
Since everything is ready, we can begin. Take the resulting dough, grease it with water and wrap it around a plastic egg. It is important that the dough plate is round and not too thick. Then we form a sausage, the thickness of which is approximately 1 cm. Divide into eight equal pieces.
Afterwards, roll each part into balls. Place the dough-wrapped plastic egg on the board. At the bottom we attach two balls, which are the legs. We attach the handles from above, and only the resulting two balls are formed into sausages. Another one of the balls is a honey pot. As everyone knows, this is Winnie the Pooh's favorite treat. We fasten the fashioned pot between the paws that are on top.
The stack comes into play. Using it, we cut out the necessary parts - fingers, honey lid. You can add anything at your discretion. For example, a drop of honey flowing from a pot.
All that remains is to form the muzzle and ears. Here we turn on our imagination, imagine what Winnie the Pooh’s face and ears are like. When you are sure that everything is done correctly, attach it to the body. Of the small parts there is a mouth, which we cut out in a stack. Well, don’t forget about the round, small eyes and nose. These are all ordinary small balls. We remember that when attaching each part, we add water. Water in this case is the glue.
Article on the topic: Artificial silk - what is it: composition, properties
This is what you should get:
Perhaps the most interesting part remains until the very end. You need to color Winnie the Pooh. How to do this is up to everyone to decide. We take paints, turn on the “imagination” button and create. The result is a bear like this:
And after that, we are inspired by our creation for subsequent masterpieces!
Pliable plasticine
Now we will tell you step by step how to create Winnie the Pooh from plasticine.
To do this you will need:
- Plasticine. Various colors required;
- Stack;
- Modeling board;
- Toothpick.
Knead the plasticine until it becomes a soft mass, ready for modeling. After this, we will make two brown balls of two tones. From a light brown ball we get sausage. Let's divide it into two halves. We form the resulting parts into a spherical form and combine them. The head and body of Winnie the Pooh have already been created. It is necessary to give the correct shape to the head. Here we need a stack. Taking it in your hands, press the ball on top, as shown in the picture:
Next we take dark brown plasticine. It should make a sausage, give it the appearance of an arch and flatten it. We attach the received one above the muzzle. We take balls and make ears. We use both dark brown and light brown. We attach the ears to the head, do not forget to press one of them with a toothpick.
Let's make indentations for future eyes. Let's use white plasticine and form small cakes. We attach black circles-pupils on top. We use the same color to make the nose. We fix all the parts in their “rightful” places. The next step is the paws. They will be dark brown in color. We sculpt four oblong droplets and attach them to the body. The last thing left is the mouth and the marks on the paws. The stack will help with this. With light movements we complete the final touches and voila - cute Winnie the Pooh is ready.
Don’t forget that this craft can also be made from felt, polymer clay, and even balloons.
Felt applique Tiger
The use of felt does not require additional preparation of the material, its special processing or skills in working with it. Non-woven material is not picky, making it easy to use even in applications.
Angry Tiger
The predator has a stern disposition, and this can be conveyed in a craft with an appropriate facial expression. Step-by-step master class.
Tiger face
A cute and smiling animal can be made from felt to decorate a child’s room.
Sitting Tiger
A full-size tiger with cute features can be easily made from felt using the following pattern.
Everyone loves soft toys
It's no secret that people like soft toys. Age is absolutely not important here, they are touched by them. Sometimes you want to buy a toy not for someone else, but for yourself. But you can not buy it, but sew it. It's not as difficult as it seems. If you have never picked up a needle and thread, then it doesn’t matter. Today we will tell you how to sew a soft Winnie the Pooh bear.
First of all, you need to take everything you need:
- Pattern;
- The material from which the toy will be made (it is better to use fur with a pile, preferably short, or felt);
- Padding material;
- Needle;
- Threads;
- Scissors;
- Wire.
Since everything is ready to go, we start with the pattern. We cut out important parts and sew their wrong sides together. We use the seam over the edge. The dotted lines mark the undercuts. They are sewn up at the beginning. The front and back of the head are stitched together afterwards. Leave a small hole in the bottom area. The blanks can be turned out, we stitch the area of the toy where the ears and head are connected. We fill our heads with the selected material.
The part for the face, previously cut out, is folded along the dotted lines, and the darts are sewn together. We stuff the resulting part with material and sew it to the head. We cut out eyes and nose from leather. Don't forget to sew on the mouth. There are letters on the pattern - B and C. The front parts are stitched so that these letters are connected. The seam is located in the middle. Let's move on to the back. The blanks are connected, leaving a hole in the neck. We turn the part inside out, insert the frame inside and fill it with filler. The head is sewn on using a hidden seam.
Article on the topic: Interior of a Narrow Hallway in an Apartment - Ideas
We sew the paws together in pairs, stuff them with material and sew them to the body. The ends of the frame must be inserted into the lower limbs, only then sewn to the toy. And here is the result. Now this Winnie the Pooh will please your eyes. You can also give a toy as a gift. It will be doubly pleasant, because it is made with your own hands.
Step-by-step photo lesson:
We will sculpt our cartoon bear in brown tones. This is exactly how Soviet animators portrayed Winnie the Pooh in such a believable way. Prepare two brown shades and an additional black.
Prepare two light brown balls to create the head and body of the cartoon.
Connect the balls and smoothly spread the plasticine with your fingers. You should get a matryoshka figure. This is exactly the silhouette that Winnie the Pooh will have. The bear has no neck and a fat belly, because he is a glutton.
Create two dark brown thin sausages for the ears. Make rounds out of them.
Attach the sausages to the top of your head.
Add a dark brown area to the front part, where the eyes will later be placed. Under this dark brown area, attach a black nose dot.
Place white eyes on the prepared dark area.
Blind small paws in the form of blocks. Black claws can be attached to the tips of the paws.
Attach the arms and legs to the bear figurine.
Cute little bear Winnie the Pooh, who constantly puffs, is ready. If you wish, you can treat your new plasticine pet with honey, because this is his favorite treat.
The master class was conducted by Anna Nigmatullina.
Making crafts from natural materials is an excellent activity for children, which develops imagination, creative thinking, and fosters a love for the world around them. Leaves, cones, acorns, chestnuts, tree bark, twigs - all this and much more can be included in the creation of a unique piece!
natural materials; can; plastic bottle; plywood according to the size of the work; cardboard; round lid; braid; self-adhesive paper or fabric for curtains; acrylic paints; masking tape.
Tools:
hot gun; scissors; stationery knife.
Mini-toy "Winnie the Pooh"
Small toys are usually very popular with children. After all, you can always carry them with you and play with them anywhere - on the street, in transport, at a party, in kindergarten.
You can find many small toys in stores, but it is much more interesting to sew such a toy yourself. Although this work is painstaking, it is not very difficult. If your child loves the fairy tale about the funny and restless Winnie the Pooh, then you can sew this cheerful teddy bear. The child will be happy with such a surprise and will not be able to part with his favorite fairy tale hero.
How to make origami from paper - Winnie the Pooh?
Posted on January 24, 2022 by Elena Prekrasnaya in Home // 0 Comments
Many people really like various designs, paper figures - origami. The question often arises - how to make origami out of paper? At first glance, the technique may seem complicated. But in fact, if you look carefully and study all the stages of implementation, then everything turns out to be quite easy. My husband and I first encountered the need to make an origami figure out of paper in our daughter’s kindergarten. Then we urgently studied the paper origami technique and came up with something we could make that was not very complicated, but beautiful. After looking through various articles and examples of figurines, we decided to make origami from paper modules in the form of Winnie the Pooh.
At first glance, it may seem that this job will not be easy, but it is not. The most difficult thing in this matter is patience, perseverance and at least 2-3 free evenings. Most of the time will be spent preparing the modules. Paper origami modules are small pieces of paper folded into triangles. You will need a lot of them.
To make a mini-toy “Winnie the Pooh” we will need:
- - paper;
- - a simple pencil;
- - bright yellow felt;
- - red felt;
- - padding polyester;
- - black beads and seed beads;
- - scissors;
- - threads of yellow, red and black colors;
- - needle.
The procedure for working on the mini-toy “Winnie the Pooh”
1. Let’s transfer the mini-toy pattern from the screen onto paper and cut out the parts. It is easy to transfer details onto paper if you place the sheet of paper on the screen and lightly trace their outlines with a pencil. We should have seven parts: body, blouse, sleeve, collar for the blouse, small ear, front and hind legs.
2. From bright yellow felt we need to cut out two parts of the body, two ears, front and hind legs (four parts each).
3. From red felt you need to cut out one collar, four sleeve pieces and two blouse pieces.
4. When all the pieces are cut out, you can start sewing them together. We fold the parts made of bright yellow felt trampled and sew them with yellow threads using an overcast (buttonhole) stitch. We will leave a hole on each part for stuffing with padding polyester or some other filler. In addition to padding polyester, holofiber and padding polyester are good for stuffing toys. It is not advisable to use cotton wool for stuffing soft toys, because... it quickly gets lost and the toy loses its shape.
5. Fill all the sewn parts with padding polyester (but not too tightly), pushing the padding polyester with a thin stick, for example, a bamboo skewer or a toothpick. After this, we sew up a hole on each piece with yellow threads.
6. Take the parts of the blouse cut out of red felt, attach them to the body of the teddy bear and sew them on both sides with red thread using a blanket stitch.
7. We attach sleeve pieces to each paw on both sides and sew the edges of the sleeves with red thread using a buttonhole stitch.
8. Carefully sew the collar to the neck of the blouse with a hidden seam using red thread.
9. Unscrew the collar and straighten it.
10. Use red thread to sew the front legs to the body directly on top of the blouse.
11. Using yellow threads, sew the hind legs to the bear’s body. The paws should not be sewn too tightly to the body so that they can move.
12. Sew small ears cut from yellow felt to the bear’s head. To sew on the ears, we will take yellow threads and sew them on with a hidden seam using small stitches.
13. All that remains is to make our Winnie the Pooh’s eyes and nose. We will make the eyes from black beads, sewing the beads on the sides of the head with black threads. We will make the nose from a black bead, also sewing it to the muzzle with black threads.
The mini-toy “Winnie the Pooh” is ready. The height of the teddy bear is 10 cm, and when seated its height is 7 cm. The toy can easily fit in a pocket or in a child’s fist. If it gets dirty, you can gently wash it by hand. Not only can this toy be played with, but older children can use it as a keychain or as a pendant for a school bag or backpack.