Modern industrial technologies make it possible to make unique objects even from such seemingly ordinary objects as chairs. And what is important, their assembly can be done with your own hands. Using your creative imagination will help you create chairs not only from metal (profile pipes), but also from plastic pipes. Just think, products made of polyvinyl chloride, originally intended only for the installation of water supply and sewerage, have become a real godsend for home craftsmen. After all, despite their simplicity, they are easily and quickly transformed into the most necessary, and sometimes unexpected, household items.
= What shelves can be made from:
| made of wood Example: DIY flower shelves 230 | from metal pipes Example: DIY pipe shelves | from PVC pipes |
| made of cardboard Example: Shelf rack made of cardboard boxes | from paper | from plasterboard |
| from glass Example: Shelves in Art Nouveau style 180 do-it-yourself photos | from old boxes Example: DIY drawer shelves 120 photos | from pallets pallets |
| stainless steel | from glass | from old stairs |
| From bars | from bottles Example: Glass bottle shelves | from driftwood and branches Example: Bookshelf made of branches and driftwood |
| made of bricks Example: Bookshelves made of bricks and boards | from newspapers Example: Newspaper shelf | From cans Example: DIY kitchen shelves: 456 photos, drawings, instructions |
Simple model
To make the simplest model of a feeder chair, you will need three interlocking metal pipes with a diameter of 20 mm, material for the seat and back, strong threads, 4 bolts and nuts. Necessary tools: electric drill, hacksaw, grinder. Manufacturing technology:
- The short sides of the seat are stitched with two wide strips and secured at the bottom with a limiter made of a thin strip. In this case, the fabric is sewn directly onto 2 metal pipes, which will serve as the legs of the chair. The material on the back is also stitched along the short sides.
- At the junction of the legs, holes are drilled in the middle of the long sides and connected crosswise to the fasteners.
- A pipe is attached to one of the legs, which will serve as a backrest.
With adjustable legs and backrest
A chair with a back is a more complicated version of a feeder chair. Material required to assemble such a chair: steel pipe for the frame with a diameter of 20 mm, fastenings (bolts, nuts), textiles for the seat and back, threads, rubber nozzles for the legs, anti-corrosion compound. The tools used are the same as for the simple model. Assembly algorithm:
- The metal pipe is cut into several parts: for the legs and seat - 8 pieces of 55 cm, for the back - two pieces of 70 cm, one piece - 30 cm.
- On two pipes, which are intended for sitting, two fasteners are installed at a distance of 6 cm from the beginning and end.
- Another fastener is attached to one of these pipes, with which the back will be mounted. The fastener is located at a distance of 9 cm from the beginning of the pipe.
- To complete the manufacture of the chair frame, the prepared corrugated pipes with fasteners are connected by two more pipes. Thus, 4 metal pieces measuring 55 cm were used.
- Pipes measuring 70 cm prepared for the backrest are connected to a pipe 30 cm long using fasteners.
- The remaining four 55 cm pieces, which will serve as legs, are attached to the ends of the frame tubes. They are equipped with rubber nozzles.
- At the last stage of making the chair, textiles are stretched over the seat and back. Holes are made on the short sides of the tarpaulin, and the material is pulled together using an elastic band. The elastic will allow the seat to sag a little under the weight of the angler. The back textile is pulled together along the long sides.
Made from polypropylene pipes
A simple option for making a feeder chair, for which you will need: PVC pipes with a diameter of 25-32 mm, fittings connecting the parts of the chair, durable textiles for the seat, fasteners, threads. Tools for assembly: pipe cutting scissors or a hacksaw, soldering iron. A guide on how to make a fishing chair from polypropylene pipes with your own hands:
- The tube is cut into pieces: 16 parts for the back, legs, and seat, the length of which you can choose yourself.
- We connect the pipe sections with fittings. For convenience, assembly should begin from the back, then the seat and handles are fastened together.
- For the seat and back, take material that is stitched along the short sides with holes for inserting pipes.
- After checking the structure for stability, it is disassembled, the material is stretched onto the appropriate sections of pipes.
- At the final stage of assembly, the parts are soldered or secured with glue.
Folding chair
To assemble a folding chair, you will need a polypropylene pipe with a diameter of 25 mm, fittings, material for the seat, threads, 2 bolts, 2 nuts. Guide on how to make a folding chair:
- The fabric is cut to a size of 18 cm. It is stitched along the short sides so as to create holes into which the pipes will be inserted.
- The pipe is cut into pieces: 4 pieces of 40 cm and 4 pieces of 20 cm.
- Long pipes have holes drilled in the middle for bolting.
- Short 20 cm sections of pipe are inserted into the prepared fabric. Corners are put on the ends.
- 2 rectangles are formed from all pipe sections measuring 20 x 40 cm. They must be connected with fabric.
- The rectangles are connected to each other with bolts and nuts in the drilled places. It is not recommended to tighten the nuts too tightly so that the chair folds effortlessly.
For structural strength, glue or welding can be used in the places where the fittings are attached. This folding fishing chair will serve for a long time thanks to the material from which it is made, it will be easy to carry, and the chair will not take up much space in your backpack.
Outdoor table made of pipes
It's a great idea to make an outdoor table for your garden with a base made from water pipes. The design looks solid and assembly is easier than you might imagine.
The top of the outdoor table is made of pipes, these are three strong 2x12 boards fastened with cross strips. It is clear that they need to be well prepared - sanded, stained, varnished or painted, whichever you prefer.
To secure the three boards, screw 1x4 strips to the bottom as shown in the photo. Then screw the water pipe flanges to these crossbars.
Then, using adapters, assemble the table frame. It is very easy and even fun, it will take about 20 minutes. If you bought black pipes, it is advisable to coat them with silver to prevent them from rusting. Another tip regarding water pipes: be sure to check the cutting and threading by screwing the pipes into a flange or tee.
If it doesn’t spin well, ask the store to adjust the cut or retighten the pipe, which should also help. Since the table is on casters, you also need a fitting that would accept the threaded rod of the wheel. It's a small plastic socket that you drive into 4 tubes. You can add a little epoxy resin to make it perfect.
If you decide not to put the table on casters, you will need to compensate for the height of the pipes (or whatever you choose for the table legs) of approximately 12 cm. This table seats 6 people. You need at least 6 inches of overhang at both ends of the table to accommodate the chairs.
But, if you want a table for 4 people, you can expand the meter tube to about 127 cm, thereby freeing up four more places for legs and elbows.
How to make a kitchen table from pipes and a solid board
Using the diagrams below, you can easily assemble a pipe frame for this beautiful kitchen table. To create a style, you will need a solid board. How to assemble a kitchen table with your own hands.
As with most projects, the exact order in which you assemble the structure can vary and depends on your approach to the assembly process. Below is a recommended step-by-step guide for assembling a kitchen table using pipes.
First install the horizontal support on the frame. The support uses six tee fittings.
Follow the diagram shown (Fig. 2) to assemble the horizontal support. Be sure to tighten the set screw to each fitting to secure it to the pipe.
From there, insert the length of pipe used for the legs into the open slots on the horizontal support (Figure 3). Tighten the installation screws to secure it to the pipe. Then insert the rollers.
Next, slide the flange fittings onto the ends of the pipe at the top of the frame (Figure 5). Once the frame is completely assembled, attach the tabletop. This project used a solid board, but you can attach any wood.
Place the countertop over the flange fittings and screw (Figure 6)
Please note that the flange fittings have four holes for mounting to the countertop. Now that the countertop is attached, you should have a complete kitchen table.
Photo source: www.simplifiedbuilding.com/projects/diy-rolling-kitchen-island
Calculations and drawings
You can design a chair from pipes on a piece of paper or a personal computer. There is no need to make complex calculations, since the products have a simple design.
When planning your work, you should consider the following nuances:
- Using the curvature factor. Curved fragments look more interesting and attractive than straight links. A chair with a sloping back will fit better into any interior. You can give the workpiece a curved shape by slowly heating it over an open flame. Then it is carefully bent and fixed until it cools completely. Another way is to use factory-made contours.
- The length of the pipes is selected taking into account the fact that part of the workpiece will be immersed in the fitting. This distance is 20-50 mm depending on the type of plastic pipes. Before drawing up the drawing, you need to experimentally measure how far the links fit into the coupling opening.
- It is better to take a sample that is comfortable to sit on as a basis for the project. You can supplement it with your own ideas. Please note that plastic bends under pressure. To increase the strength of the finished product, transverse ties are provided on the legs and seat. Reinforced plastic is much more practical than analogues without aluminum inserts.
- The diagram is drawn to scale with an accuracy of 1 mm. It displays all the details, places and order of joining of workpieces to each other, couplers and partitions. An option is provided for cutting blanks, in which the amount of waste will be minimal.
- If the workpieces are joined without glue or soldering, then the joint must be strengthened. To do this, screws are used, which are screwed in so that they tighten and fix both fragments. It is better to screw hardware on the underside of the pipe and from the back. This way they will be practically invisible.
- The finished diagram is the basis for carrying out calculations of building materials.
- What do you do with old furniture?
- Poll Options are limited because JavaScript is disabled in your browser.
Stages of making a rack yourself
First of all, you will need to choose the location of the future product, determine the desired size, perform calculations and a drawing.
All important data is recorded only on paper, then the rack will turn out correct and there will be no unexpected discrepancies during the installation process. Well, then you can start creating a metal frame.
Stage No. 1. Create a drawing
On sheet A4 you should draw a sketch of the future rack indicating all the desired dimensions that were determined during the calculations:
- Optimal width 2000 mm
- Nowadays, designs with wide shelves are quite common, making it much more convenient to install containers.
- At the same time, it’s a good idea to make different distances between the tiers. There is more at the bottom and less at the top, so the mass will be distributed more evenly throughout the metal frame.
- It will be convenient to place heavier objects on the lower shelves and lighter ones on top.
Stage No. 2. Choosing a fastening method
We choose a reliable fastening method.
Mounting options:
In a hardware store you can purchase special chrome-plated pipes for structures, their standard diameter is 22 mm. And at the same time, devices for assembling metal structures
It is important that all parts are matched to the diameter of the structural pipes. The welded fastening method is quite strong, but also labor-intensive. It is possible to assemble a frame from various profile pipes using a welding machine, but this work is more difficult, dusty and noisy. The racks are bulky and heavy, but reliable. Thick metal often needs to be drilled for numerous fastenings, which can also cause some inconvenience and waste of time
Thick metal needs to be drilled frequently for numerous fasteners, which can also cause some inconvenience and waste of time.
Stage No. 3. Assembling a metal structure
We assemble the rack.
When the drawing is completed, calculations are made, and materials and assembly method are selected, then installation work can begin:
Taking into account the recorded dimensions, the necessary parts for the rack are cut from a profile or prefabricated pipe. Next, the frame is assembled
It is important to remember that the rack must be attached to a wall or floor. A metal wall rack adjacent to the wall is attached to slats
The metal wall rack is attached to the wall and is attached to slats.
- If you are planning an additional box, then it is better to use sheets such as OSV and chipboard for it.
- The use of gypsum plasterboard is undesirable for the rear wall and side ceilings. If you plan the drawing correctly, it is not necessary to attach the sheets to a metal frame.
You can plan everything so that they can be placed in the nests that formed the corners.
Stage No. 4. Final processing
If the rack is black metal, but you want to somehow enhance it, then painting is the most suitable option.
Small instructions:
- It would be a good idea to varnish or cover all existing wooden elements, if any, with a paint composition.
- And in general, there are many different shelving structures with very complex structural features.
- It is not necessary to create a skilled frame yourself if the structural model is very complex.
You can purchase a ready-made metal rack in a specialized store. The product, as a rule, is sold disassembled and is quite simple to assemble (see How to assemble a rack from a profile). In conclusion, we recommend that you watch the video in this article and become more familiar with the nuances of the assembly.
Choosing the right material
All pipes made from polymers are commonly called plastic. However, their appearance and properties differ markedly due to the difference in the raw materials. Accordingly, the methods of connecting them differ.
Polyvinyl chloride (PVC) pipes:
- Various colors (originally white).
- They are connected to the fittings with glue; you can do without it (then the structure will be collapsible).
Polypropylene (PP) pipes:
- Various colors (initially black).
- Rigid, produced in the form of segments of a certain length; are connected by low-temperature welding or using metal components.
A profile pipe is a metal pipe that has a cross section other than circular. The most common are square and rectangular, but oval and diamond-shaped ones are also produced. It is easy to achieve the required bend from a profile pipe using a “Snail” type machine.
Lamp design at home
The basic principles of making a lamp with your own hands are as follows:
- The effect of negligence. The more open, massive parts, the better.
- The undesirability of eclecticism. It is inappropriate to combine crystal lampshades with plastic pipes.
- Limited color range. Futuristic style does not involve bright colors. All decorative elements must be white, gray, black or bronze. The use of copper and brass is allowed.
- Material limitation. Fabric, rubber, natural materials will not fit into the style.
- Dim lighting. You should not use powerful incandescent lamps, because retro style implies dim light. You can use a dimmer to control lighting.
Drawings and dimensions
First of all, it is worth mentioning the collapsible frame options. Such models are very mobile. Their parts are connected with bolts. The storage can be easily moved to the desired location. But there are also non-demountable frame racks.
To join their parts use:
- welded joints;
- self-tapping screws;
- nails (this is determined by dimensions and material).
When large in size, such assemblies are virtually stationary. It is not only impossible to take them out through a door or window, but even to disassemble them. It will only be possible to break it, so dismantling is fraught with many difficulties.
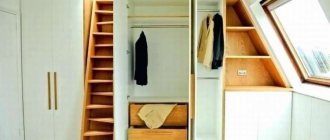
As for the console versions, such racks do not have sidewalls. But it provides for attaching the shelves to the solid rear wall.
As for folding models, they are closer to a stepladder. The dimensions are relatively small, and you can’t count on decent capacity. However, the mobility is even higher than that of the collapsible versions, and this largely compensates for the low capacity.
As for the shape, rectangular and triangular types of shelving are optimal for both the pantry and other rooms. A rectangle is generally a classic shape. You just need to choose whether to install square legs or extend the supports to support the entire structure at once
When drawing up a diagram, you should pay attention not only to the geometry, but also to the dimensions of the storage unit itself.
The height is mainly limited to 2 m. In this case, even most people of average height, without stepladders or stools, can reach the top shelf. As for the depth, it is entirely determined by the size of the objects laid out.
Hanging or protruding things are not very good, but a huge half-empty space is unlikely to be a rational choice. To store books, magazines, and flowers, you need shelves 0.3 m wide and 1 m long.
For garages and sheds, for garden tools, for wallpaper and for illuminated seedlings, it is recommended to use shelves 0.4-0.5 m wide. They can also be used to stack:
- tires;
- canisters;
- spare parts for cars and garden equipment;
- metalworking, carpentry and entrenching tools;
- fasteners;
- various clothes.
Particular attention should be paid to the shelving in the bathhouse. All of them must be mounted not only on the floor, but also on the wall, because otherwise it is impossible to ensure reliability
It is unlikely that anyone will like falling from a shelf to the floor. All such products must be made of wood and carefully polished.
This is what a rack cabinet looks like with a height of 1716 mm, a rear wall width of 1038 mm and a single section width of 324 mm. But this is a homemade budget class shelving unit. The depth of the shelves reaches 500 mm. Their length is 1550 mm. For work, plywood with a thickness of 1.5 cm and pipes measuring 2.5x2.5x0.2 cm are used.
Plastic pipes. Ideas for children
If you have a small child in your home, then do not rush to buy the necessary items for crazy money. Kids are growing up quickly and soon all this will no longer be relevant. Try to show your imagination and make useful things for the children with your own hands.
Manege
In order to limit a small child’s movements around the apartment, a wonderful device has been invented - a playpen. You can buy it, or you can make it according to your individual measurements! You will need a lot of material to make the playpen, so you won’t be able to get by with scraps in the design.
It is best to purchase pipes in the store, having previously calculated how many of them are needed to create the playpen. Do not regret the money spent; after the child grows up, the playpen can always be disassembled and made into something else.
When creating a playpen, take into account the distance between the bars and the size of your baby; it will be a shame if the child crawls between the bars. Experienced parents advise to come up with fastening the structure to a reliable support to prevent the playpen from tipping over.
Swing
To make swings, it is recommended to use reinforced plastic, because... the situation here is related to the movement and safety of the child. Start making them only when you get good at working with simple crafts.
There are many swings. The most interesting and attractive ones in the form of swinging sofas can be found in country furniture supermarkets. They're just expensive. See how they are made, take the necessary dimensions, develop a sketch adapted to your leftovers.
Football goal
Do you live in the private sector or have a dacha? Consider making children's soccer goals from plastic pipes. In fact, the product will consist of several components that will need to be assembled into a frame. To be more convincing, you can purchase a net and stretch it over the manufactured gate. When the little football player grows up, you will disassemble the structure and immerse yourself in creating a new masterpiece.
small waterfall
An interesting tip for a summer residence is a small waterfall. On hot days it will be a great salvation for children. The waterfall is a U-shaped structure. Drill holes in a row in the horizontal rack, and provide places at the base for attaching water hoses. By supplying water you will get a water arch, you won’t be able to kick your baby out of such a shower!
Plastic pipes are an excellent material for realizing your bold ideas. Create, dream, create, delight your loved ones and friends with useful homemade products.
https://youtube.com/watch?v=sds70qlLDm8
Assembly of the structure
In order for the installation process to be simple and not cause much trouble, it is important to draw up an order or, better yet, a diagram for assembling the product. You can do this yourself, but the option of using one or another type of furniture made from standard materials as a sample is also suitable. In addition, there are special construction publications devoted to this topic. The assembly diagram and even drawings are taken from there. Taking a sample of classic furniture as a basis, it is recommended to take into account the properties and characteristics of plumbing systems.
You should start working with pipes with simple products, like shelves. With experience comes skills, and the task becomes more difficult. The variety of options is limitless and depends on the desire and imagination of the author. The reward will be the uniqueness of the piece of furniture and the knowledge that it was created with your own hands.
We make and assemble a metal frame with our own hands
When all the necessary materials and tools are ready, we begin to manufacture the structure. We follow the following algorithm:
- We use a marker to mark the pipes from which the blanks will be made.
- Using a hacksaw or grinder, we cut the racks, transverse and longitudinal crossbars.
- We make the sidewall from blanks. To do this, we first mark the location of the jumpers on the rack, connect them with clamps or weld them.
- We attach the second rack to the welded jumpers.
- We process the welds with a file or grinder.
- We lay the first side frame on the workbench and assemble the second from the blanks, securing the parts with clamps.
- All parts are connected by welding.
- We assemble the second side frame with a bolted connection, without fixing it with clamps, so that clamps can be installed.
- We weld the longitudinal jumpers to the sidewall using a joining angle.
- We process the seams with a file or grinder.
- We weld the second side panel to the jumpers.
- We weld metal plates-legs to the ends.
- To secure the shelves, we will make embedded parts from metal plates. Each mortgage five cm long must have two holes for self-tapping screws.
- We weld the plates in increments of 30 cm.
- We install the finished rack vertically, check for strength and stability by shaking it to the sides with our hands.
If the rack is prefabricated, we weld the sheets and begin painting with special metal paint. If you need a collapsible structure, the frame is ready, we prime it, paint it and make shelves. Usually in this type of rack they are made of wood about 1.5 cm thick. We install them on a metal base using corners after the paint has dried.
Tips and tricks
Sometimes a garage rack is made mobile. This is convenient if the room is often rearranged and if it is generally quite spacious. Wheels need to be welded to the legs of such a rack.
When placing your work equipment and items on the rack, remember that it is better to put the heaviest ones on the lower shelves, and rarely used ones on the high ones. We place things that are often in use on the central levels.
On the outside, you can make small hooks on the side walls to hang work clothes and wires on. The versatility of the rack is an important aspect in its use.
Master class No. 3: Loft table lamp made of pipes
Durable, easy-to-make, industrial-style desk arm suitable for office or home use. It practically “sheds” cold or warm white light through the pipeline, in which it is pleasant to work or engage in your hobby.
Tools and materials
- One long nipple;
- one short nipple;
- 6 pipe squares;
- 6 short nipples for connecting elbows;
- 3 plumbing tees;
- electric drill;
- cord with socket and switch;
- glue gun (hot glue);
- insulating tape.
Manufacturing instructions
Step 1.
- First, you need to clean all pipes with white spirit or a special cleaner; if there are stickers, you need to remove them.
- During work, the cord with the switch will have to be pulled through the pipes, so for now we will cut out the switch - it will be put in place later.
Step 2.
- We insert the lamp into the socket and pull the cord through the square.
- In order for the lamp socket to hold, we fix it with a glue gun, filling the cavity in the square, as shown in the photo.
- You need to pour it carefully, not reaching the thread.
- Let the glue dry.
Step 4.
Let's prepare a hole for the cord on the other side. To do this, use an electric drill to drill a hole in one of the tees.
First, imagine how the lamp will stand on the table, only then mark the drilling point and drill the part.
Step 5.
- We assemble threaded pipes using nipples, as shown in the photo.
- You should get: 4 corners, like the base of a table lamp, 3 tees twisted together, the factory hole is directed upward, and the one made, on the contrary, downwards, on the invisible side.
- Two nipples are connected to each other - this is the lamp holder. As assembly progresses, we pull the cable through the tubes.
Step 6.
We disassemble the switch that was cut out. We take out the old wires and use electrical tape to make a new twist, connecting the ends of the wires to the corresponding channels in the switch. Reassembling the switch.
Step 7
Check how the switch works and whether you are satisfied with the appearance and stability of the lamp. If something is wrong, in such a practical design it can be easily corrected by turning the parts.
A stable, comfortable and completely unexpected DIY designer lamp can safely be called an indispensable companion for your evenings!
You can also make a very stylish table lamp from copper pipes or empty bottles, a master class of these 2 lamps is in the material Table lamp from improvised materials.