Natural wood fits harmoniously into almost any interior. A tabletop made of a high-quality processed solid piece looks original and stylish, creating a cozy atmosphere in the room. The material is warm, pleasant to the touch, and has a beneficial effect on the psychological state of people.
However, it is not easy to buy a ready-made countertop made of natural wood. There are few of them, the prices for such products are very high, and the quality of the wood may not be the best. Especially when it comes to a tabletop made from cut wood, which requires high-quality preparation and processing. It is much cheaper to make such a product yourself. Let's look at the features and methods of making a table from cut wood with your own hands.
Features of tabletops made from cut wood
An ordinary tabletop made of natural wood is a wood panel glued together from several boards. It has the correct geometric shape, the edges are processed with a shaped cutter or, at a minimum, are polished with high quality.
Expert opinion
Korzhavin Daniil Dmitrievich
Designer of stylish home furniture
A saw-cut tabletop is a solid piece of a tree trunk, which is a cut made perpendicular or oblique to the longitudinal axis. The thickness of the cut is chosen based on the shape and characteristics of the existing piece of wood. As a rule, the edges of the cut are not shaped in any way, leaving the natural contours of the tree trunk as nature created them.
There are different cutting options:
. This cut produces a plate, the size of which is determined by the diameter of the trunk. The stresses in the massif are distributed approximately equally in all areas, which avoids deformation during drying;
perpendicular to the longitudinal axis- at an angle to the longitudinal axis . This cut allows you to obtain a plate of a larger area, the shape of which is close to an oval. Shrinkage stresses are located unevenly, which requires high-quality preparation and conditioning of the trunk before sawing;
- along the longitudinal axis . This cut allows you to obtain a layer of maximum size. Its width is limited by the diameter of the trunk, and its length is determined by the size of the log. Loads during shrinkage are located according to the direction of the annual rings, which often causes the board to bend into a tube.
The first and second cutting options are most often used. The first is chosen if there is a workpiece (log) of large diameter. Such a cut is economical; here only the thickness of the cut and the allowance for grinding are wasted.
An inclined cut gives an expressive and unique pattern of annual rings. However, this cutting method is the most uneconomical - the remaining parts of the trunk have a small area and cannot be used for any large-sized products.
A longitudinal cut gives a regular board of the required thickness. Sometimes the trunk is cut exactly in the middle and two halves are obtained, of which only the flat sides are processed. This option allows you to get two tabletops with a pattern that is repeated in a mirror image.
Expert opinion
Korzhavin Daniil Dmitrievich
Designer of stylish home furniture
There are other options for assembling a tabletop, in which they use cuts not from one trunk, but from a large number of thick branches (or thin trunks). As a rule, many cuts are laid and the spaces between them are filled with epoxy resin (or other hardening high-strength polymer).
This method allows you to get a tabletop of any size, but does not provide the attractiveness that a solid piece of wood has. Sometimes, instead of pouring, a large piece of glass (or monolithic polycarbonate) is used, which is installed on top of a set of saw cuts.
Traditional simple stools
Timeless classics live not only in the facades of buildings. Time-tested solutions are also preserved in the designs of stools. Adding smooth lines to their appearance eliminates boring angularity.
In the photo below we see the classic version. Thanks to the rounded drawers and legs, it looks quite decent. The milled grooves on the legs also improve its appearance.
Simplicity has its own charm. Designers successfully play with this quality, creating deliberately rough, brutal products. Artificially aging furniture is not an easy task. The author had to work a lot on the product, the photo of which we see below.
The category of classic “stool design” includes designs with drawers under the seat. To do this, use wide side frames and hinged lids.
Table legs
The design of the legs is usually chosen based on the characteristics of the tabletop, as well as your own capabilities. Sometimes a full-fledged tsar belt with conventional supports is made. Many users make legs from thick branches from which the bark has been removed. On the reverse side, blind holes of the appropriate diameter are made into which the ends of the branches are glued. All that remains is to adjust their length so that the table stands tightly and does not wobble.
There is an interesting option using combined materials. The table legs are forged supports, which in themselves have high decorative qualities. The overall appearance of such a table is very attractive; the product looks elegant and rich.
What is best to use as a raw material and where to look for it?
Not all wood is suitable for furniture. Lucky are those who manage to find oak (especially stained), larch or ash.
When choosing a material, it is important to see in advance what part or furniture it will be used as, since the natural shape of the branches is complex.
Almost finished composition - furniture made from tree roots
Depending on where the branch is found and what condition it is in, the processing will differ.
Fresh ones are dried; those caught from the water are first cleaned of rot and rotten layers.
Irregularly shaped branches are used to create structures that are classic in human understanding.
How to choose material
The easiest way is to purchase a ready-made saw cut and look for suitable options in online stores. However, for many users it is more interesting to choose the material themselves and make a plate from a log.
To make a tabletop, you need a plate of the largest possible size. It can be obtained from large diameter logs, at least 500 mm (ideally more than 600 mm).
Coniferous trees predominate on the territory of our country. They have pronounced annual rings, straight-grained wood with a large amount of resin. It is the resin that can become an undesirable point, since it has poor contact with paint and varnish coatings. It is noteworthy that most conifers have a similar texture and are easy to confuse.
Hardwoods have a wide variety of textures. There are rocks with pronounced annual rings and a large number of pores. These are ash, acacia, chestnut. There are species with homogeneous and inexpressive wood - birch, maple. However, it is these rocks that have significant undulation in the lower part of the trunk. Therefore, it is recommended to cut them along the longitudinal axis.
It is difficult for an inexperienced person to determine by the type of log what it will look like when cut. This is a task that is not available to every professional - a tree trunk is a living organism, and its condition is extremely difficult to predict.
However, you can adhere to the basic rules:
- You should not choose a rotten log. You can knock on its side - if the sound is dull and “raw”, it’s better to look again;
- an uneven and knobby trunk in this case will only be an advantage, since its cut looks more attractive;
- the closer to the root the cut is located, the more interesting its texture will be;
- cracks or other imperfections, if not too many, can only decorate the tabletop (although they will have to be completely filled with epoxy resin or polyester putty).
Most often there is not much choice. There are few large trunks, since they are brought only to order. Therefore, you have to be guided by the main condition - size. If the size of the cut is suitable for solving the tasks, flaws can be corrected or hidden.
Ideal cuts: where to find?
A novice craftsman thinks that to create such a product it is enough to go out into the yard or into the forest, select a suitable log and cut “circles” for decoration. But it's not that simple.
To prepare cuts yourself, you need to spend a lot of work and time.
But if you make a mistake, you will have to start all over again, since it is impossible to work with cracked discs. You can find a supplier on the Internet. The main advantage of ready-made cuts is that they have already been processed and after purchase you can already begin to realize your dream.
You can buy saw cuts at a sawmill, which will be a budget option, and the choice of designs is huge.
The only drawback is the processing problem. The peculiarity of handmade furniture is that it is unique and exists in a single copy. When selecting a cut, it is necessary to take into account the future design of the tabletop itself.
To make it interesting, you need to select sections of different diameters and the required quantity.
The cut pattern itself also matters. After all, it is this that is the highlight of the future product. Ideally, for greater convenience, draw a layout so as not to improvise, but to know exactly the expected result. Then you will avoid disappointment in the final result.
You can use one type of wood, or combine different options.
Choosing the right material:
- The saw cuts must be dry, and preferably from a type of wood that is resistant to moisture.
- There should be no knots on the workpiece, as they can break off.
- Pay attention to the thickness of the cut. Too thin can crack, and thick will weigh down the craft and make it rough.
It is better that the thickness is from 30 to 50 millimeters. - Avoid low prices for material, since very often cost is an indicator of quality. A product made from low-grade material will not last long. Why waste energy and time?
- Each end must be well glued, so you need to purchase the optimal amount of glue so as not to save it during the work process.
- After working with a grinder, you will need sandpaper, its grit should be 120 or higher.
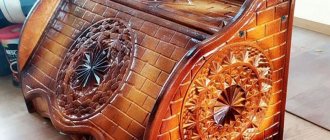
Glue-resin for wood.
Making saw cuts
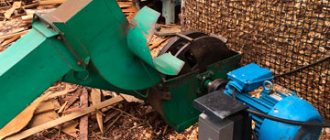
As a rule, the cut is made using an electric or chainsaw.
It is necessary to mark the cutting line by tracing the log in a circle (or along the oval line if the cut is inclined). When making a cut, you should try to maintain a plane to reduce the amount of grinding. Some craftsmen make special devices that make the work easier and help ensure the most even plane. However, if you need to make just one plate, you can do without additional devices - the time spent on their manufacture can be used for processing the cut.
Expert opinion
Korzhavin Daniil Dmitrievich
Designer of stylish home furniture
The task is quite complex and responsible. If you do not have experience and skills in such work, it is better to contact a specialist and ask him to make a cut according to pre-made markings. This will not take much time, but will significantly speed up the processing of the saw cut.
Can you do it yourself?
Before becoming a unique product, a slab goes through several stages. This is a saw cut that has gone through all stages of processing and is used as furniture or additional decor.
Most often, saw cuts are used as a countertop or table.
Making a slab is a labor-intensive job that takes a lot of physical effort and requires a large amount of financial costs. Before starting the manufacturing process, you need to think about the entire process. The process of creating a slab yourself is the key to obtaining an exclusive product.
Leveling the plane
The cut that has just been made usually has to be prepared for grinding. You can immediately take up the grinder only in particularly successful cases, when the cut turns out to be very even.
First, the surface must be planed using a manual or electric plane. It is important to keep in mind that the blade of a hand plane must be prepared for such work and fine teeth must be applied to it. Otherwise, it will stick, especially when passing against the direction of the fibers. An electric planer is much more effective in this regard. You just need to adjust the reach of the blade so as not to remove too thick chips and not reduce the thickness of the sawn block.
Planing is completed when a sufficiently flat plane is obtained. It is checked with a ruler or a straight strip applied to the plane of the block in several places and directions. After this you can start sanding.
Grind the cut using a grinder or a special attachment on an electric drill. First, the plane is inspected and checked for cracks, potholes or other flaws. If there are any, it is recommended to fill with epoxy resin or polyester putty. When the material hardens, begin processing the plane.
Using successively sandpaper with coarse, then finer grains, a smooth cut surface is obtained. The quality of sanding depends on the skills of the craftsman and the type of wood - some of them can be practically polished, others can only be leveled as much as possible.
Expert opinion
Korzhavin Daniil Dmitrievich
Designer of stylish home furniture
As a rule, change 2 or 3 sizes of sandpaper. This is enough, since wood is not metal, too small marks on its surface are almost impossible to see.
What will you need for your job?
To make an original table from a vertical cut of wood with your own hands, you need to prepare:
- A cut of dry wood with approximate dimensions of 1700x600 mm, 25 mm thick.
- Metal (steel) plate about 600x35x3 mm.
- 4 steel rods with a diameter of 9 mm, length 1.5 m.
- Epoxy resin (transparent).
- Wax, varnish for a transparent finishing coat of wood.
- Black spray paint.
- Screws No. 12 (1.9 cm).
- Painting tape.
- Grinding machine.
- Sandpaper of different grits.
- Hammer.
- Chisel.
- Drill.
- Welding machine.
- Protective gloves and glasses.
Varnishing, polishing
When sanding is completed, the surface is thoroughly cleaned of dust and finishing begins. First, apply a layer of deep penetration primer. This allows the top layer of wood to be compacted and improves the adhesion of the final varnish layer to the surface.
Would you make your own countertop from a cut piece of wood?
Of course! It's better to buy
Please note that primer is not needed for all types of wood. Basically, it is used to reduce the consumption of more expensive varnish. At the same time, the varnish is often absorbed much deeper, which helps to fix and compact the material. Therefore, only highly porous workpieces need to be primed.
If coniferous wood is used, the resin escape routes must be closed. To do this, the material is thoroughly wiped with turpentine and solvent (645, 646, 647). After this, you need to apply a varnish that does not react to the presence of resin. It is recommended to use nitrocellulose compounds, since other varnishes may dissolve upon contact with the resin.
If there is a lot of resin, you can heat the top plane - this will cause abundant resin. The workpiece will have to be heated for quite a long time until the bulk of the resin is removed. However, it is unlikely that it will be possible to completely get rid of it; additional measures will have to be used (resin removal and coating with neutral grades of varnish).
Varnishing can be done using a spray gun, or using a regular paint brush. The number of layers depends on what further actions are planned with the countertop. If polishing is carried out, you need to apply a couple of extra layers - they will go away when polishing the surface. It is necessary to keep in mind that after each layer you need to wait for the varnish to dry completely, usually for a day (there may be other options, it depends on the type of varnish).
Polishing the varnish is done in several stages:
careful sanding with fine sandpaper. First they use coarser grains, then move to almost zero grains. The entire process requires the use of 2 or 3 numbers of skins. Grind only by hand, wrap the sandpaper on a smooth wooden block and do not apply too much force;- When the surface is brought to the smoothest possible state, take the foam rubber attachment to an electric drill and polish the varnish. Use 3M automotive polishing paste;
- first polish with the first number, then with the second. There is no point in using the third number at home - its effect is rarely noticeable.
Expert opinion
Korzhavin Daniil Dmitrievich
Designer of stylish home furniture
The polishing procedure is quite complicated and requires a lot of time and effort. However, if you try, you can get a very high-quality coating that corresponds to group A.
Drying process
After carrying out the procedures for dissolving wooden cuts, you need to carefully study the drying methods. The process is extremely necessary; it is the one responsible for the quality and service life of the future slab.
Drying occurs naturally in special drying boxes. You can dry the wood yourself, without using special chambers.
Certain conditions must be met:
- Choose a place where the sun's rays do not reach. Dry indoor air will speed up the process.
- Build the canopy so that there are air gaps in it.
The process of drying the blanks takes place over the course of a year by about 2-2.5 cm. A wooden cut, 5 cm thick, will dry for about 2 years.
Questions and answers
Making a table from sawn wood is a largely creative process. The search for the right techniques often leads novice masters to a dead end. A large number of questions arise, some of them should be answered immediately. This will save time, and may give someone useful ideas.
Can I use epoxy to level the surface without sanding?
You can, but you will have to be more careful with the table surface. Any load can lead to cracking of the coating and cause peeling of the epoxy. In such cases, it is recommended to use an additional transparent element - for example, glass.
What types of wood are best suited for making a saw-cut table?
Here we can recommend such species as oak, walnut, ash or more exotic ones - mahogany, rosewood, paduk. However, they are extremely difficult to find in log form - they are usually supplied as lumber. You can look for thick birch stumps, or use a cut of maple or alder.
Is it possible to stain wood?
This procedure is done very often. However, you need to choose the right material. It is recommended to use an alcohol-based stain, or even better, a regular water-based stain. It is applied before pouring epoxy or primer. This is an important point, since after this the stain will not be absorbed into some areas of the countertop, and unsightly stains will appear.
What varnish is best to use for finishing?
It is necessary to take into account that the tabletop experiences significant operational loads. Therefore, you will need the hardest varnish. Automotive acrylic products should not be used - they resemble hard rubber. Furniture nitro varnish (for example, domestic NTs218) is best suited. However, it is best to use polyurethane varnishes for parquet. You can buy Rustins clear Varnish. It dries quickly and is highly durable. It will take longer to polish, but the quality of the coating will be very high.
Is it necessary to polish the varnish?
No, you can simply cover the surface with a neat thin layer. You can do without it altogether by using linseed or any special oil (for example, Danish Oil for treating gun stocks). This impregnation does not form a surface layer, but makes the wood brighter and more attractive.
Wooden cuts
Previously, small tree cuts that were so useless to anyone went into the furnace. Now, various products from wooden saw cuts are at the peak of their “boom”. Not just like that.
Items made from wood cuts look very beautiful and very solid. Free material, in the form of dry branches in the forests, is another plus for various kinds of products from saw cuts.
- Garden paths are made from saw cuts
- Floors in the house are made from saw cuts
In today's article, we will tell you step by step how to make a table from wooden saw cuts
Step 18: installation with glue and screws
To ensure a tight fit, I applied glue to the drilled holes and inserted the legs. Additionally, I secured it with self-tapping screws, screwing it into the tabletop at an angle.
Step 12: Filling the Table with Resin
As soon as the filled voids in the upper part of the table have hardened, I begin to fill the surface. To do this, I mix a large volume at once and apply it to the table from above. I refill after 48 hours to ensure a nice uniform gloss finish.
Advantages and disadvantages
Chairs made from logs have many advantages:
- Affordability of the material;
- Environmental friendliness of the product;
- High strength and wear resistance of the structure;
- Ease of manufacture. The work of constructing a chair from a log can be done even by those who do not have carpentry experience. Moreover, the simplest design can be made in less than 1 hour;
- A broken structure can be easily repaired or disposed of;
- Ease of product care and restoration;
- Original appearance of the product. Having a developed imagination, you can build not only a practical, but also an unusual structure.
However, log chairs also have their disadvantages. The disadvantages of products include the following factors:
- High sensitivity to moisture. Even with careful treatment of the material with water-repellent solutions, a log may crack if exposed to moisture for a long time;
- The massiveness of the products and their heavy weight;
- Flammability of the material. Almost any wood is a highly flammable material. Therefore, it is not recommended to use such chairs near an open flame, even after treatment with a fire retardant solution.
Also, the disadvantages of chairs made of natural wood include the specificity of tactile sensations and associations that this type of furniture can provoke.
Types of chairs made of logs
Furniture made from solid wood can be classified both by its intended purpose and by the type of material from which the item is made. However, the main division of chairs into types occurs according to their design and purpose:
- Dining chair with backrest;
- Stool. The product can be of different heights;
- Bar design.
Log stool
Each of these products can be assembled using several elements, or made from a single piece of solid wood.
Features of operation
Chairs made from pieces of logs can be used both in an apartment or private house, and outdoors as garden furniture. However, in order for the products to last a long time, when using them you must adhere to the following recommendations:
- Protect furniture items from moisture as much as possible. Do not place chairs on a wet surface and do not wash them with a stream of water;
- If cleaning is necessary, the product can be wiped with a dry or slightly damp cloth;
- It is not advisable to place hot items on chairs made from solid logs. This can cause damage to the wood.
When using the product as a piece of garden furniture, in autumn and winter, the chair should be stored in a dry and warm room. It is unacceptable to cover furniture with polyethylene for a long time, as this will lead to a greenhouse effect and damage to the wood.
A log chair should be periodically impregnated with stain
Periodically, the product must be updated by sanding it with sandpaper, impregnating it with stain and opening it with varnish. For home use, this will have to be done once every 3-4 years. For garden wooden chairs, the coating is renewed annually.