Pros and cons of changing oil through the dipstick
The advantages of this method are obvious to everyone:
- It's easy to do. There is no need to unscrew the engine protection, remove the drain bolts and first drive the car into the pit. Of course, this does not apply to those cars where you have to crawl under the car to change the oil filter.
- It's free. Once you have purchased such a device, you can use it for a very long time. In this case, you do not need to spend 250-300 rubles for a replacement.
As for the disadvantages:
- There is a possibility that combustion products of additives and oil remain at the bottom. This is not certain, so it cannot be confirmed. The opinions of experts on this matter are contradictory.
- Sometimes it is not possible to pump out all the oil. This is possible if it is very viscous (dense) or the car is on a slope.
- No benefit for cars where the filter is replaced in a pit.
Why change the oil in your car engine?
A car engine is a complex structure, the operating principle of which is based on the rotation of various parts. This creates friction, which oil is designed to minimize. It also removes heat from engine parts and protects them from corrosion. Timely replacement is necessary to extend the life of the motor.
It is recommended to change the oil fluid every 10 thousand kilometers , unless a different period is specified by the manufacturer.
Changing the oil on time reduces engine wear, namely:
- reduces friction of engine parts;
- prevents engine overheating;
- reduces the formation of corrosion.
Device for changing oil through dipstick
This device is quite simple, and its operating principle is based on creating a pressure difference inside and outside the container. It consists of:
- Main tank.
- A pump for pumping air out of the tank and creating a pressure difference.
- A hose through which oil will flow from the oil pan.
The process looks like this:
- Combine all these elements. That is, connect the hose to the tank, insert the pump into it from above.
- Insert the hose into the hole for the oil dipstick until it stops. That is, until the tip of the hose rests on the bottom of the pan. The hose itself is quite thin, so it easily penetrates the hole.
- You pump out the air and create a pressure difference. You need to pump until it becomes hard.
- Afterwards the pump can be removed. Due to the presence of a check valve in the main tank, the pressure inside will not go anywhere. Engine oil will begin to slowly flow into the main tank.
Depending on what viscosity of oil is used and what condition it is in, the process of changing the oil through the dipstick will last about 10-15 minutes. It rarely lasts 20 minutes if the replacement is carried out on a car with a large engine.
Our recommendations
- Performance with manual syringes depends on physical strength and patience. It is quite tiring to hold the smooth cylinder with one hand and pull the piston rod with all your might with the other. Therefore, the pumping time is approximate. By the way, you need to work with thick gloves: after all, when hot oil hits the syringe body, it instantly heats up.
- Electric pumps must first be moistened with a small amount of oil. Without this, their self-absorption is insufficient: no more than 10 mm Hg. But if you put just a little bit of any oil there, the pump will create a sufficient vacuum.
- We do not recommend syringe products for pumping out oil: there are no hoses and they are inconvenient to use.
- Of the electrical products, only SAMP 2 GS9222 performed well.
- Vacuum pumps with chambers for accumulating oil are driven by muscle force, but the forces are not as great as in syringes. You can create a vacuum reserve and move the end of the hose in the pan to better remove residual oil. Both vacuum devices performed well. At the same time, “Mastak” has a smaller safety margin of parts than its column-like competitor. But it is easier to place the “ball” somewhere in the corner of the balcony.
The results of our examination relate to a specific sample of products and cannot serve as a basis for judgments about all products of the same name.
Oil change pumps: “Behind the wheel” choice
Draining oil with washer pump
This is the same budgetary, but labor-intensive and “dangerous” path. There are a lot of washer pumps - you want them from VAZ, you want them from GAZ, you want them from VAG. But remember - they are not designed for pumping oil, even when heated, which means they can fail at any time.
For example, let’s take the KALUGA ENTS2512 washer pump, which produces a power of 1.1 atmospheres and is powered by 12 Volts. Perfectly suits our conditions. You still need to buy tubes for it - you can take any, but it is better to choose oil- and gasoline-resistant ones, for obvious reasons. Another important parameter will be the internal diameter of the tube - it is 5 millimeters. In order not to deceive yourself, we take 4 meters of such a hose and cut it in half.
Then we need to somehow power this pump. On its body there are 2 male connectors - positive and negative. We buy (or get it by any other possible means) 2 female connectors, 2 wires and crocodiles. We also make sure to buy a syringe - any one, the main thing is that its nozzle fits the cross-section of the tube, it will be useful to us later. We put it all together and get a pump that can be powered from the battery. The main thing is not to confuse the polarity.
After you have decided through which fitting the pump draws liquid, connect the hoses, insert one into the dipstick body, and the other into a container for testing.
We turn it on and... nothing happens. Why? Because these pumps are unable to pick up oil and they need to be helped to take their first steps. This is where the syringe we bought earlier comes into play. When the pump is turned on, through the outlet tube (which goes into the drainage container), you need to pump out a little air from the pumping line - this way the pump will take the liquid and be able to work.
In addition to the materials required above, you should be patient - with this pump you will be pumping out oil for quite a long time, its performance is low. Well, of course, as we have already warned you, it can fail at any moment.
Oh yes, these VAZ crafts also love to leak, so don’t be surprised if something happens.
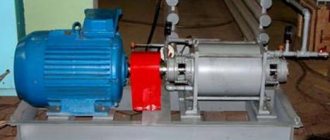
Operating principle and design of the pump
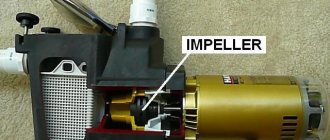
The electric oil pump has a fairly simple design and small dimensions.
The weight of most models is no more than 500 g. The standard equipment of the pumps consists of two clamps for installation and two hoses for pumping out engine oil. The internal working chambers of the pump are lubricated with oil, which prevents parts from being worn out when first started. The chambers are completely sealed and have rubber seals. The pump rotor plates are made of stainless steel, aluminum and copper.
The brake pump is equipped with a reliable motor that drives a gearbox with blades. On average, the motor voltage ranges from 3 to 12 Volts. At 12 Volts and a current of 8 A, the shaft rotation speed is approximately 14,100 rpm. The gearboxes in most pump models do not have lubrication, so the lubricant must be supplied to the part independently.
The brake bleeder pump operates as a result of fluctuations in working volumes between adjacent plates and sections of the pump housing with the rotor surfaces. During this, the chamber on the left side of the unit is enlarged by rotating the eccentric rotor clockwise. This lowers the pressure inside the pump, allowing fluid to flow into it. The working volume on the right side of the device decreases, which promotes fluid injection.
Oil change devices
There are many devices on the market that allow you to change the oil yourself. Moreover, there are mechanical models in which negative pressure must be created using a hand pump, but there are also electric ones. The first ones are cheap, and their price varies from one thousand to two thousand rubles. More expensive electric models are sold in a very wide price range: from 4 to 15 thousand rubles.
The most popular is the HC 2081 installation with a tank capacity of 80 liters. Of course, it is not intended for one-time use. Such models can be installed at various service stations, where drivers come every day to drain/refuel fuels and lubricants.
As for the usual mechanical device, you can generally make it yourself. You only need a long hose that would fit through the hole for the dipstick with a hard, unbendable tip, a pump to pump out air, and a container where all the oil will flow. The main difficulty here is to create a sealed space inside this container. Otherwise, it will not be possible to create a pressure difference, and the oil will remain in the engine.
How to choose a quality syringe?
Choosing a syringe for filling oil is quite simple. The main thing is to understand for what purposes it is needed. If you plan to use it at home, i.e. To change the oil in the garage, then a conventional device is enough. Professional devices should be purchased for service stations and service centers.
But you shouldn’t skimp on the quality of the syringe. Devices that are too cheap may begin to leak after just a couple of uses and their use will be impractical.
Today consumers prefer brands such as Groz, Licota, Pressol. But it’s best to consult with a specialist in the store before purchasing. It will help you choose the most optimal syringe.
Pumping oil through the dipstick - basic methods
There are two main methods for pumping oil out of the engine through the dipstick - using a pump, using a syringe. There is also vacuum pumping, but this method is more complicated than the first two and is generally applicable in service conditions. We invite you to familiarize yourself with the methods that you can apply even in the parking lot in front of your house.
We warn you: these methods of draining engine oil do not have the same effect as draining oil through a plug. The plug is located at the lowest point of the crankcase, so the maximum amount of old oil is removed through it. The methods described in the article cope with this to a maximum of 95-98%. But this is not scary, because with every oil change, the oil filter is also changed, which will easily absorb all the crap that remains in the oil pan.
Also, before this method of changing the oil, the engine needs to be thoroughly warmed up - this way the oil will get maximum fluidity, which means it will drain through the dipstick as efficiently as possible.
Some tips for car enthusiasts ↑
Along with overfilling, underfilling will also play a cruel joke in the form of a drop in pressure, wear of couplings, and synchronizers of the automatic transmission. Not everyone does the control measurement correctly due to their inexperience or inattention. Be sure to have a flat surface and the transmission is heated to a temperature of 75 - 80 °C. Do not confuse this with engine heating. These are two different things. Warming up the box is possible only through movement. Squeeze the handbrake, the rocker is in position “P”.
By the way, craftsmen have found use for the Zhane syringe not only in the transmission, but also when changing the oil in the engine compartment. The time frame was cut in half. The amount of waste increased by 10%. This means that the service life of the new lubricant will be extended. Fair wind. All the best.
Forum on oils, additives and lubricants
- Unanswered topics
- Active topics
- Search
- Users
- our team
- User themes
- >at a conference
- >>in the forum
- User messages
- >at a conference
- >>in the forum
- >>>on topic
ATF replacement tool
When replacing the working fluid in an automatic transmission manufactured by AISIN 09G, new ATP oil is pumped through the drain hole; for this I made a device with which you can fill the oil under pressure. I came across the idea on the forums of schoolchildren.
The device turned out to be quite convenient and we easily changed all the oil in the machine. The service asked to keep this device, I really liked it. )))) I will share my experience:
Materials for production:
1. Plastic bottle 1l or 1.5l.
2. Two car wheel nipples.
3. Dishwashing detergent lid.
4. Tube with a diameter of 5-10 mm.
5. Flexible hose from a kitchen faucet 50 cm
Types of greases and their classifications
Manufacturing:
We take the lid from the dishwashing liquid, cut off the top nipple and get a smooth hole into which the nipple is placed, which can be wrapped a little with tape for better sealing. On the back of the nipple we insert a tube through which the oil will be sucked in:
Drill a 13 mm hole in the top of the bottle (side) and insert the nipple:
We cut off the nut from the kitchen hose, leaving the thin end with the M10 thread, step 1. (It just fits the thread in the drain hole of the 09G box). The thickness of the cut hose fits the diameter and fits well onto the nipple thread:
A complete device with which you can pump ATF into the automatic transmission of a Skoda Octavia A5:
After replacing the working fluid in the automatic transmission, you need to set the level, as can be done in a garage, see here.
Article rating:
Purpose
Some vehicle components are located in difficult places where access to filler funnels and crankcase drain holes is difficult. An oil syringe is designed to supply lubricant to hard-to-reach places in mechanisms, gearboxes, and transmission units. Also, if the necessary options are available, a plastic syringe for filling oil can perform the function of collecting waste, which allows servicing the units without disassembling or dismantling.
Some specialists use tools to lubricate hard-to-reach threaded connections.