Dear craftswomen, you probably know Chupa Chups caramel. There is hardly a store checkout where this sweetness would not be displayed. Did you know that this sweet on a stick was invented by the hereditary confectioner Enrique Bernat from Spain in 1958, and the bright design was created by Salvador Dali himself, the Spanish artist?
Chupa Chups is an excellent material for creativity. Let's talk about what kind of crafts you can make from lollipops. Most of them are quite simple, so create with your children. Joint creativity strengthens the emotional connection in the family and gives joy.
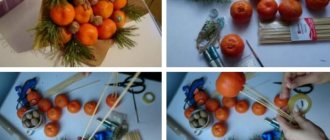
Bouquet cake step by step
A base in the form of a cake is cut out of foam plastic. She is coloring. Flower lollipops are inserted into it on top. For better fixation they are glued. For such a craft, sweet flowers should be prepared in a slightly different way than for a bouquet.
Manufacturing procedure:
- the chupa leg - the chupsa is shortened a little to completely fit into the foam;
- The petals are made from different colors of corrugated paper. You can make some of the buds from ordinary rustling packaging film.
You can beautifully decorate a real cake with Chupa Chups flowers. To do this, they are glued to the box. It is better to place them either in the middle of the box or in the corner.
Children's crafts from bags
Parachutist
Your child can even cope with this interesting idea on his own. Prepare him garbage bags, plasticine and thread.
Step-by-step instruction:
- Cut out a large circle from polyethylene. Make sure your child handles scissors carefully.
- Next you need to make the parachutist himself. Invite your child to mold it themselves from plasticine. The person should not be too small.
- After the modeling is finished, you need to attach our “dome” from the package to the parachutist. We do this with threads and in four places.
Jump rope
From the bags you can make excellent sports equipment for your child. You will need bags of different colors and tape.
Long strips must be cut from the pacts. They will become ribbons for braiding.
Girls who already know how to braid their dolls will especially enjoy this activity. Make sure that the polyethylene threads do not lose tension.
For convenience, you can attach the base of the braid to a chair. When the desired length is woven, wrap the beginning and end with tape, forming handles.
Pipidastra
If your child loves to dance, you can please him by making a pipidastr.
Prepare a lot of bags in advance. The more polyethylene you use, the fluffier the toy will be.
Step-by-step instruction:
- Take about 40 trash bags and stack them. Don't forget to pre-cut off everything unnecessary: handles, drawstrings and bottom.
- The bags should not move apart or slide, so secure them with a pin or paper clip.
- Carefully fold the stack in half and make cuts towards the fold, without cutting 6-7 centimeters to it.
- After that, unfold and remove the paper clips. You have cuts on both sides, with an untouched area inside.
- We roll our bag into a tube and wrap the middle with tape.
- All you have to do is fluff the ribbons and you're done!
- The ribbons came out on both sides with a holder in the middle. You can make another version of the pipidastra: cut the stack only on one side, but then you need to make more cuts. This will give you a fringe on one side.
Chups in a box
A sweet bouquet in a box will look modern and stylish. To do this, you need to choose a beautiful box or make it yourself. The shape can be square, rectangular, trapezoidal. The box is made of thick cardboard.
The fastest option is to take a ready-made box and cover it with beautiful wrapping paper.
A foam base is inserted into the box. It should be the same size as the box and completely fill its entire lower part. Lollipops in the shape of flowers are inserted into the foam.
You don’t even have to make petals, but simply stylishly wrap each candy in corrugated paper and tie it with a ribbon.
A bouquet of lollipops can be made in other variations. The most important thing is not to stop there and keep experimenting. For beginners, it is recommended to make bouquets of sweets with your own hands for the first time from just chups, then gradually add a bit of decor to the craft.
Composition options
A few examples from experienced craftsmen will help you make a bouquet of lollipops with your own hands even more impressive and attractive. There are quite a lot of design options. With the help of additional elements you can make an unusually attractive and useful bouquet.
Additional elements for the composition:
various beads, they are glued to the petals or to the paper framing the bouquet;- heart-shaped craft - a heart is cut out of cardboard. It is covered with red colored paper. A skewer is attached to it, which is also decorated with red paper. A bow is tied at the base. The heart is inserted into the bouquet. It should protrude above the flowers;
- tiny plush soft toys - one or more toys are placed in a bouquet. To make them hold tighter, it is best to glue them to a skewer;
- decorative elements in the form of butterflies, snowflakes, birds, fir branches, berries;
- other candies.
It is not recommended to use additional materials all together. It is better to add one or two items of the same theme to the bouquet, which will complement each other.
Gift in a mug
This unusual composition will delight any child, because in addition to lollipops there are other types of sweets. For the craft you will need:
- beautiful heavy mug;
- popular chocolate jelly beans M&M's;
- 5-9 chups;
- several cockerels on sticks;
- colored paper;
- wooden barbecue sticks.
The length of the chups stick is increased by gluing wooden skewers to it. The resulting element is pasted over with colored paper or tape. A blank in the shape of butterfly wings is cut out of colored paper. You need to prepare 2 pairs of such blanks. They stick to a chups stick.
The result is a butterfly whose head is a round piece of candy. You can make several such butterflies. You need to make flowers from other lollipops.
M&M's jelly beans are poured into a mug. Lollipops in the shape of butterflies and flowers are inserted into it. The composition is decorated with cockerels.
Preparation of materials
Before starting work, it is necessary to prepare all the necessary materials so as not to be distracted during the work. To decorate a small bouquet of 9-15 candies on a stick you need a little time and imagination.
Necessary materials:
- lollipops - the greater the number of lollipops, the more magnificent and impressive the composition will be. It is better to use regular-sized candies rather than large ones;
- wooden skewers for barbecue;
- colored paper - you can take corrugated material. Colors may vary. The author himself decides which ones are best for him for the craft. Usually the buds are made from pink, scarlet, yellow (if you plan to make a sunflower bouquet), crimson flowers;
- satin ribbons - it is best to purchase them in several colors. One of the colors should be emerald. With its help the stem turns green;
- scotch;
- glue.
Bouquet-horn of Chupa Chups
A bouquet of Chupa Chups is a good idea for those who want to surprise loved ones with an unusual gift for little money. It can be given to both a child and an adult, because everyone loves sweets, regardless of age.
Tools
- Glue gun
- Scissors
- Ruler
- Lighter
- Secateurs
Materials
- Chupa chups lollipops – 11 pieces
- Kraft paper
- Corrugated paper
- Red satin ribbon
- Paper butterfly
- Nonwoven
- Food skewers
- Paper lace
- Colored stationery cardboard
We make a cone for the bouquet from colored cardboard measuring 20x20 centimeters.
- To prevent the cone from losing its shape, grease its edges with glue and press it well with your fingers.
- Next you need to cover the outside of the cone with craft paper, the size of which is 21x21 centimeters.
- The parts of the craft paper that extend above the cardboard cone should be trimmed off.
- We cut paper lace, which is sold in a confectionery store, into two halves. One should be slightly larger than the other.
- Glue the larger half of the lace to the cone as shown in the photo below. Its upper part should be a couple of centimeters above the edge of the cone.
- We make three cuts on the lace, grease it with glue and bend it inside the cone.
- Glue a satin ribbon bow on top of the lace. The ends of the bow need to be scorched with a lighter so that they do not fray.
- We decorate the bow on top with a butterfly, which we also attach with hot glue.
- The end of the Chupa Chups stick needs to be greased with glue and a food skewer inserted into it. This must be done with all candies.
- Next, cut square pieces of non-woven fabric measuring approximately 6x6 centimeters.
- They need to be folded diagonally, glued to the base of the candy and carefully wrapped around the candy.
- The candies are folded into a pyramid, the skewers in the middle are coated with glue and secured with a strip of corrugated paper.
- After skewering, it is necessary to trim so that the bouquet of Chupa Chups fits in the cone.
- Apply glue to the skewers and insert the bouquet of candies into the cone.
- We cut more squares from non-woven fabric, fold them diagonally several times and glue them into a bouquet, filling the voids.
- To make this delicious craft look even more beautiful, we decorate it with a satin ribbon at the end. We form double loops from it and glue it into the bouquet.
Chupa Chups sticks
First, I’ll tell you why you need a hole on a stick.
It turns out that this helps the candy stay on top and not slide off.
Sticks are great for crafts and activities with the youngest children.
You can make beads from chupachups sticks by cutting them into pieces and putting them on a thread. The hole in the stick is large enough, so even kids can handle this activity.
The sticks can be used as counting sticks.
They will also serve as a wonderful decoration for old flower pots. Simply glue them to the surface using a glue gun or all-purpose glue.
Flower pot made from lollipops
This option is even simpler and faster to implement.
For it you will need:
- a pot or a bright round cardboard box;
- lollipops;
- soft colored paper (it’s beautiful when it matches the color of the details on the pot/box);
- scissors;
- glue/glue gun;
- foam ball (its diameter should be slightly smaller than that of the selected pot/box);
- narrow ribbon for decoration;
- ruler;
- decor for the pot/box as desired.
The creation of this gift composition occurs in the following order:
- Cut out squares from colored paper (the length of one side is 10 cm), there should be as many of them as lollipops.
- Make a small hole in the center of each for a lollipop stick.
- Thread the lollipops through them, fold the two corners of the squares with their vertices, you get almost a triangle.
- Then bend the corners of the base of the newly formed figure clockwise around the candy so that they meet and partially lie on top of each other. Repeat with the rest of the preparations.
- Secure the resulting buds with a thin strip of tape, which is hidden under a decorative tape.
- Place the foam ball in a pot/box. If it moves there, then fix it by filling the empty corners with cotton wool or other filler.
- Place the “flowers” by lowering them into the foam half the length of the stick. It is better to start from the top of the hemisphere and move further in a checkerboard pattern.
- Release some of the ribbons out and curl them with scissors.
- If desired, decorate the pot/box with stickers, glitter, and decoupage.
Practical tips for creating a bouquet
Basic tips for creating a bouquet of sweets for a boy are as follows:
Any bouquet of sweets can become themed if you add an appropriate element to it (a Santa Claus figurine, chocolate eggs, and so on). For a child's birthday or other children's holiday, you can use any sweets and their combinations.
Stand (frame) for a bouquet made of cardboard ring
Stand (frame) for a bouquet made of a cardboard ring with wire
Stand (frame) for a bouquet made of cardboard and foamiran
Stand (frame) for a bouquet made of foam and wire
Stand (frame) for a bouquet made of a cardboard ring “on a leg”
Stand (frame) for a bouquet made of a cardboard round box
- You can decorate any design with decorative ribbon, bows and greeting cards.
- If a transparent vase is used as the basis of a sweet bouquet, you can fill it with small candies, which will become an excellent decoration. In most cases, when using them, adding polystyrene foam or floral foam will not be necessary - the sticks will be well fixed without them.
- In addition to candy and candy bars, individually wrapped nuts and dried fruits, portioned boxes of chocolate or nut butter and other treats (in fact, any food that can be attached to a skewer without damage) can be added to the sweet bouquet.
A sweet bouquet intended for a boy can be supplemented with a small toy, stationery, holiday decorations, and so on.
Advantages
Such a gift has many advantages, for example:
- Originality. This is a bright and unusual gift; it will certainly please the person it is intended for.
- Uniqueness. Such a gift is one of a kind, because it is made with your own hands.
- Interesting idea for a gift. This special gift will surprise and delight anyone.
- Perfect for sweet lovers. After all, you don’t have to take Chupa Chups; you can take other candies, the ones you like best.
- Beautiful packaging. With the help of a bouquet you can beautifully give sweets.
- Ease of manufacture. Making a bouquet of sweets with your own hands for beginners is a very simple task.
- Suitable for children. Children will be delighted with such a surprise, especially if the bouquet, in addition to sweets, contains toys.
A bouquet of Chupa Chups is a wonderful gift idea for family, friends, and children. Such a gift will certainly bring positive emotions and surprise the person for whom it is intended.
Features of sweet crafts
In stores you can now purchase exclusively designed sweet compositions. But for such a bouquet, as a rule, the price is appropriate. To give a unique gift, you don’t need to spend a lot of money ; you can simply create an original masterpiece yourself . The work budget in this case will be minimal. As a result, the master himself will be surprised at what kind of work can be created from simple sweets.
Bouquets of sweets are suitable as gifts for both adults and children. This lollipop surprise will be a memorable present. Any little girl, even the most picky one, will be simply happy to receive an unusual and tasty gift.
To quickly learn how to make bouquets of Chups with your own hands, a beginner should become more familiar with the technique of making an exclusive gift.
A master class on a bouquet of chups will tell you more about the process of making the composition and different design options.
Bouquet of chupas for a child
Materials and tools for making flowers:
- – office paper of different colors;
- – corrugated green paper;
- – glue stick, “Titan” glue;
- – pencil, scissors, ruler;
- - Chupa Chups candy.
For decoration we will need:
- - basket;
- – corrugated red and green paper;
- – red ribbon;
- – thick cardboard, polystyrene foam;
- – wooden skewer, pencil, scissors.
Holiday gift
An original handmade bouquet will be suitable as a gift for a special celebration. It will take some time to make, but the recipient will appreciate the result.
The following materials are needed:
- 7−9 candies;
- the same number of bamboo sticks;
- a square measuring 50x50 cm made of corrugated yellow paper;
- heat gun;
- 50 cm each of yellow and lilac tulle;
- 50 cm lilac satin ribbon;
- 10 white beads;
- double-sided and regular wide tape;
- packaging of any decorations, for example snowflakes;
- green and white ribbon for flowers.
To obtain a more lush composition, the amount of consumables can be increased. Small size Chupa Chups are best suited for a bouquet.
The step-by-step instructions are as follows:
- Attach a bamboo stick to the base of the candy and secure it with tape.
- Take the green ribbon and tie it to the base. Cut off the resulting tip.
- Wrap the ribbon tightly around the stick, leaving no gaps. Secure the tip using a heat gun.
- Repeat steps 1 - 3 with each candy.
- Then cut a 15x15 cm square from lilac tulle. To get more lush flowers, you can take more fabric.
- A similar square should be made from yellow tulle. Depending on the number of flowers in the bouquet, there may be more squares.
- Place a candy in the center of each square of fabric. Make a hole in the middle and thread the stem through it.
- Fold the edges of the fabric. Secure the tulle with a satin ribbon. The resulting petals should be higher than the candies themselves.
- You can glue decorations to the petals.
- The result is the first flower from the bouquet. The remaining elements of the composition are made using the same scheme.
- Make a composition from the resulting flowers. Bandage with the remaining tulle.
- Wrap the bouquet with yellow fabric and secure it at the base.
- Wrap everything in corrugated paper.
- Wind the composition with thread, trim the ends.
- Decorate the gift with the remaining decorative elements.
Step-by-step execution of a bouquet using the sweet design technique.
Let's start by decorating the basket. Take green corrugated paper, cut it into strips 20cm long and 5cm wide. Fold each strip in half and randomly cut out leaves.
- Glue the prepared foam plastic to the bottom of the basket. Now we will insert the leaves along the edge of the basket, gluing them with glue.
- Cut the green corrugated paper into narrow strips and glue it onto the foam. You can glue a green circle. You can decorate the basket to your taste, using any available material.
- Let's move on to making sweet flowers. Let's take a sheet of office paper. We measure 21cm on the long side of the sheet, draw a line and cut it off. The result is a square.
- Fold the square in half, in half again and cut along the fold line. We ended up with four small squares that we will turn into flowers.
- We take a square, fold it in half, in half again, and now we make a triangle.
- Draw a cut line on the triangle to create flower petals.
- Cut it out. At the end of the triangle you need to cut off the paper a little to make a hole for the chups. We lay out our workpiece. The result was an eight-petalled flower.
- Cut out one petal.
- Using scissors, curl the petals.
- Lubricate one petal with glue and connect it to the other petal. Forming a flower.
- We use the same principle to make the rest of the flowers for our bouquet. We make them multi-colored to make the bouquet bright and elegant.
The flowers are ready. They really look bright.
- Take the chups, insert it into the hole and glue it to the flower. This is such a cute, big-eyed flower.
- Let's make the rest of the flowers. There are already three of them. And here is the whole bouquet!
- Let's start making sepals. Cut green corrugated paper into squares with a side of 5cm.
- Fold the square in half, in half again, make a triangle, round it and cut out the teeth. Let's make a hole by cutting off the tip of the triangle. We lay out our workpiece. It turns out like this.
- Let's make them according to the number of colors. We will have nine of them.
- Glue the sepals to the flowers.
- Cut a narrow green strip from the corrugated paper and wrap it around a chups stick.
- To make the flower stem longer, you can insert a wooden skewer into the tube and also wrap it with green paper.
- The flowers are ready.
- We decorate the basket with flowers. Along the edge we insert short-stemmed flowers into the foam.
- We place flowers with a long stem in the center. Here's what's happened so far.
- To complete the bouquet and its significance, we will make a red heart. After all, we give a gift to someone dear to us and with great love. To do this we will need red corrugated paper, red ribbon, thick cardboard, scissors, a pencil and a heart template.
- We trace the heart template, cut it out and wrap it in red corrugated paper.
- Take a wooden skewer and glue it to the heart.
- We tie a bow.
We insert our “loving heart” into a basket of flowers. You can go congratulate.
From candy
A sweet bouquet of candy for a boy can be presented for any occasion, without any exceptions.
A well-composed composition will serve as a decoration for the holiday table, and then become an excellent dessert. For this project you will need:
- Glass vase, preferably cylindrical. It holds the flower foam well and has enough space to place a layer of small colored candies inside.
- Flower foam.
- Ribbon for tying a vase.
- 3 pieces of square tissue paper to match the selected candies.
- 1 piece of cellophane, cut to tissue paper size.
- Wooden skewers (1 for each candy, plus extra for large and heavy sweets).
- Transparent cellophane bag.
- Clear packing tape.
- Scissors or jewelry cutters (a device that can cut wooden skewers).
- A non-serrated knife (may be needed to cut through flower foam).
- Optional: small decorative balls, slimes, soft toys and other small inedible items.
The process of creating a candy bouquet is as follows:
- Place a plastic bag inside the vase and fill it with small, colorful candies (such as jelly beans), leaving enough space for the floral foam to be placed on top.
- Next, you need to tightly tie the edges of the bag and secure with tape. You'll want to make sure the treats inside the vase are securely wrapped as this step will keep them fresh and clean. If you are using small individually wrapped candies (such as tiny chocolate eggs), you can place them inside the vase without the bag.
- The flower foam should be wrapped in a strip of tissue paper.
- Then you need to take 2 pieces of tissue paper and 1 piece of cellophane (square, same size) and turn them into a diamond position. You need to bend the bottom part up and the side edges inward.
- The design created in the previous step must be wrapped in floral foam and placed in a vase on top of the chocolates.
- Next, you need to figure out what size “flowers” you need for the bouquet, and trim the wooden skewers as necessary (on the blunt side, since the sharp end will be needed to pierce the floral foam).
- Using a large piece of clear packaging tape, secure each candy to a wooden skewer. For heavier items (such as a stuffed toy or large chocolate figurine), you can use 2 skewers.
- Then you need to stick all the “flowers” into the floral foam located in the vase (the tallest blanks are best placed in the back, the lowest ones in the front).
- After this, you should wrap the vase with ribbon and, if desired, make a bow.