Even if a girl prefers to take care of her hands in a salon, she will have several bottles of nail polish in her cosmetic bag. Having a supply of bottles at home means you have the opportunity to repaint your nails to suit your mood or refresh your manicure before an important event when you can’t get to a professional. Nowadays, many have mastered salon coating techniques and successfully use them at home, so the number of bubbles can be more than a dozen. Where to store an arsenal of varnishes and hand care products? On a convenient shelf! We’ll talk about what they are like and how to make them with your own hands in this article.
Storing nail polishes
Girls are such girls!
First we create a problem for ourselves, and then we try to solve it)) For example, nail polishes - almost all of us love bright manicures. We paint our nails either to suit our mood or to match the color of our new handbag, and ask the artist to paint deer for the New Year and flowers as soon as the smell of spring begins. And even if you don’t have time to go to nail salons, and you’re too lazy to paint your nails at home, each of us has several bottles with our very favorite colors. And the VseNaMestakh team became curious again - how the storage of varnishes and manicure accessories is organized for the most ordinary girls. There will be many options further! Storage in baskets, boxes and other “improvised means” I’ll start with myself: Several years ago I ended my “quiet obsession” with varnishes, when I was interested in painting my nails every 2-3 days in different colors, drawing patterns and choosing a design to match the color wardrobe items. Now almost all the colors have somehow disappeared from my reserves (and there were purple and orange, even blue and green shades!), now I, as an inveterate conservative, cut my nails short and paint them exclusively red! And I keep a small collection of red shades in a small basket in my dressing table drawer. There are also several bottles with base and clear coat, nail polish remover and cotton pads, and a separate basket with various files and other manicure items.
Based on the results of a survey of my girlfriends, acquaintances and colleagues, it turned out that many store their “paint and paint” stocks in this way. Storing polishes in baskets and boxes is very convenient - the bottles don’t roll all over the box, a feeling of order is created, and it’s convenient to take the box out into the light and choose the desired color.
Here’s what the girls themselves say about this storage system: Alena: “I have a sad story with varnishes - I don’t like them, and they don’t like me. But I still have a few bottles, I keep them in a tin tea box in the kitchen table drawer. There is also a manicure set. It’s convenient for me to do a manicure in the kitchen because it’s light and there’s water.”
Tanya: “I keep it on a shelf in the closet in a box from some kind of souvenir. True, all the varnishes no longer fit. On the one hand, it’s convenient - everything is in one place, on the other hand, there’s the problem of finding the right color and an ever-increasing number of bottles. I want to find a more rational storage solution!”
Oksana: “The green box contains the polishes that I actively use now. In the distant are those that are awaiting their fate: either they will be given as a gift, or their season will come. There are also all sorts of manicure items and remover. My life hack is tiny ceramic mugs for liqueur - I pour nail polish remover or nail polish thinner into them. And when the nails are already painted, I correct crooked lines or smudged polish. I dip a flat brush and straighten it.”
Anya: “My varnishes are stored in a wooden box made from some kind of cognac bottle. The box is getting a little small, but I don’t want to change it – now it’s so neat and beautiful!”
What other storage options are there? Homemade organizers. If you are a creative person and like to make all sorts of interesting things for decoration and interior, then shopping baskets and boxes will probably seem too boring and ordinary. After all, you can make a varnish storage system with your own hands! The simplest thing is to cover a cardboard box of suitable size with wrapping paper and make dividers in it. On the Internet you can find interesting ideas for such options and even detailed master classes with complex multi-level designs.
Natalya: “This, of course, is not the limit of perfection, but now my entire collection of varnishes is stored compactly and all colors are visible. I saw the idea on the Internet and modernized it for myself - it’s a box from scales, which I supplemented with thick cardboard shelves and covered with oilcloth.”
Olya : “My hands are crazy! Once I bought assorted cookies in a box with compartments and the idea came by itself! I didn’t change anything inside, but I lined the sides with satin and made all sorts of decorations - I store in this organizer not only polishes, but also cosmetics, everything is in one place and looks beautiful on the chest of drawers!”
A worthy alternative to handmade boxes are ready-made universal organizers with dividers. They can be plastic, wooden or fabric. Such organizers can be found in household and construction departments, ordered in the VseNaMestakh online store, or wait for a package from China.
And for the most picky manicure lovers, there are special professional cases and storage boxes : huge suitcases, plastic boxes with compartments or small acrylic stands and special shelves - all this can be found in specialized manicure stores. The sad downside of this storage system is that these items are quite expensive.
Inna: “At first it was a hobby, and now I earn extra money by doing manicures at home. Here I have the only place where there is order and harmony. All bottles are stored in a professional acrylic stand on a special bedside table on wheels. All the liquids and tools for manicure are right there.”
Galya: “I ordered a shelf for varnishes to match the size of my cabinet from a company that makes all sorts of things and display cases from plexiglass.”
Let's take a look into the bins of the lacquer maniacs? What if there are not 2-3 bottles of varnish, but 10? What if 50? Or even a couple hundred? Do you think that so many polishes can only be found in a manicure salon? It turns out that there are real polish maniacs (the girls call themselves that) - they collect entire collections of polishes from their favorite brands, chase limited editions, mix colors from different jars, share their impressions and exchange their treasures. Among my friends there are girls like this and, surprisingly, not one of them has a convenient storage system - nail polishes gather dust on open shelves, occupy entire dresser drawers, stand in assorted boxes in the closet...
Lucy: “Laaakiiii! They stand on two open shelves and regularly fall from there, gather dust, you can’t see all the colors at once... Of course, there is some kind of organization system here - all the varnishes are arranged by brand (I remember what color I have from which brand, I’ve never duplicated did not buy). Ideally, I want narrow shelves so that the varnishes stand in one row, and then I will measure them by meters!”
Tatyana: “This is chaos! My polishes are everywhere - in the dresser, on the dressing table, in the bathroom cabinet, stuffed into all cosmetic bags and bags. I really don’t remember where I have which polish, and I spend a lot of time looking for it! It’s infuriating!”
Olya: “I’ve dedicated a whole drawer to polishes in the chest of drawers, there are additional boxes in the drawer, I’m sorting, arranging, and still I can’t see where anything is!”
What options? But the girls were happy to share their ideas and Internet finds that they would someday implement. Lucy: “This is my ideal! Beautiful, compact, everything is in sight! Whenever you get around to making something like this... I saw it on Aliexpress, but I think you can build it yourself. I'm waiting for inspiration!
Tanya: “I dreamed of a special case, but it costs so much! On one forum I saw an amazing idea: a girl uses a suitcase to store miniatures for board games. It is not just big, but huge - in a standing position it reaches to the knees, and at the same time it is made of light plastic, there is even a shoulder strap, the latches are reliable. But the most important thing is what is inside! There are six foam inserts with forty cells each! Foam rubber stretches, holds bubbles well, and the partitions can be cut out and moved to the right place. All you have to do is tune in and place your order!”
Olya: “I found a simple master class online - you need to buy small magnets (I saw “everything for the holidays” in stores) and glue them with superglue to each bottle of varnish. And attach the bubbles to an iron sheet, or even to the refrigerator!”
Oksana: “I can’t sleep peacefully now - I want to do the same: I saw a picture where the varnishes are stored in a thick office folder with ties - it looks like such a strong box-box. Tall bottles probably won’t fit there, but most of my polishes will like this move.”
The girls gave me more ideas:
- cosmetic bags for storing polishes sometimes appear on sale they can be compact (for several pieces) or quite spacious (a hundred bottles can easily fit in).
Interesting ideas for choosing a location
To store cereals, it is permissible to choose interesting places that will help maintain its freshness and save space in the kitchen.
Secret sliding panel
To hide your supplies, you should build a pull-out shelf into your kitchen unit. In appearance it resembles an ordinary decorative panel. This is an unusual method that does not require significant costs.
Hanging shelves
This option is well suited for a small kitchen. Moreover, it is quite acceptable to place hanging shelves on the refrigerator. This will help save space and become an unusual design solution.
Retro cabinet
A hanging wooden cabinet, complemented by glass doors and metal handles, looks good. This design will fit perfectly into a classic kitchen. In this case, the boxes can have a symmetrical or chaotic arrangement.
Alchemy laboratory
Small corks with spices and flasks with cereals look good on a hanging shelf. To make the design even more impressive, add mystery vessels filled with vegetable oil or vinegar. Such a structure will look very mysterious and interesting. However, it is not recommended to hang such a shelf above the stove. Constant exposure to high temperatures negatively affects the performance of products.
Hanging stand
A non-standard option are containers that are hung with strong hooks. They can be fixed on metal or wood. It often has to be made protruding in order to organically arrange dishes with cereals. It is best to choose elongated narrow containers.
Magnetic board
This method is more suitable for spices, since large dishes will look a little strange. In addition, it is much easier to place small containers on the board. To implement this solution, it is worth attaching a magnetic sheet in a convenient place. Then you should choose small jars with metal lids or magnets. They should be attached to the canvas in any order. To use this method for cereals, you will need a lot of space and powerful magnets. However, the containers should not be too heavy. They are placed so that you can comfortably reach each can.
How to store fireweed tea at home, rules and methods of drying
Rack with pull-out shelves
An unusual option would be a small narrow cabinet with pull-out shelves. It is worth making several spacious drawers for pasta and cereals. It is also permissible to provide space for tea, coffee and spices. A cabinet designed to match a kitchen set will look very organic. Pull-out shelves greatly simplify the search for products and organize their placement.
As decor in the kitchen
Fans of rustic design should place beautiful containers for cereals and spices on small shelves. It is recommended to choose beautiful covers for them - they can be wrapped in fabric. You should not place more than 2-3 containers on one shelf. In this case, the interior will be overloaded.
Drawers
An interesting solution would be many small sealed boxes that have transparent side doors. At the same time, you should allocate a separate area in the kitchen for containers or order an unusual set with built-in drawers. Thanks to this, the room will look more original.
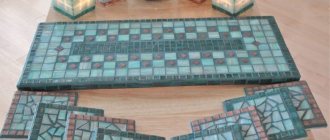
Making a cardboard organizer for varnishes with your own hands
How to make a nail polish organizer from cardboard with your own hands.
View detailed instructions:
How to make a nail polish organizer from cardboard with your own hands. First you need to take cardboard, the usual kind that is used to make boxes for transporting products. Tools you will need: glue (I use TITANIUM and hot hot glue), a stationery knife (wallpaper), a ruler, desire and patience
You can start working. First you need to come up with a design for a future organizer for storing gel polishes. I usually get inspired while I'm working, so I just start making cardboard organizer pieces.
I cut the bottom in two pieces, gluing them perpendicular to each other. Then, I cut partitions and miniature shelves, which rise tier by tier in rows. There will be tubes of varnish on them. The right side of the cardboard organizer consists of shelves for varnishes.
I left the left part for two large tiers. There will be large containers with degreaser, gel paint, a glass with files and other trinkets for coating nails with gel polish.
A special feature of this cardboard varnish organizer is that it has two retractable shelves on both sides of the product. It's like they're hidden. The left one will store disposable wipes, and the right one will store tubes of gel polishes, which will be used extremely rarely.
All that remains is to “dress up” your cardboard product. I use pieces from a cardboard box of cookies (although you can feel free to use colored paper or fabric from old clothes). So, having cut the pieces to the required size, I bring my product into human form by placing them on glue. Ready!
Source of the article: https://www.livemaster.ru/topic/2721511-delaem-organajzer-iz-kartona-dlya-lakov-svoimi-rukami
Brief overview of types of organizers
An organizer, whatever it may be, solves the problem of organizing your cosmetics and your good mood: everything is in place and at hand. Let's look at what materials organizers can be made of and where they can be used.
Organizer materials
Organizers for storing your decorative and natural cosmetics can be made from:
- boxes;
- cardboard;
- tubes from newspaper;
- plastic trays;
- tin and glass jars;
- plywood and wood;
- fabrics and felt;
- oilcloths;
- bamboo mats.
Types of organizers by functional use
The organizer can be:
- stationary at home - stand on the bedside table or dressing table, or can save space and hang on the wall;
- travel case - the product is rolled up and tied with a ribbon, which is very convenient when traveling.
Now we will take a closer look at and make our own cosmetics organizers.
DIY “marble” boxes: you will need cookie boxes and nail polish
The craftsmen who work on-site for clients, regardless of their specialization, are first and foremost high-class professionals. And of course, fragile, sweet girls. It’s no longer fashionable to show up to a call with a heap of bags or bend under the weight of a sports bag with the necessary materials, tools and equipment. The customer’s opinion of you won’t be the best if the medications they brought with them spill and the decor falls apart. In addition, the fickle female fantasy requires a manicurist, hairdresser, makeup artist, lash maker or cosmetologist to bring with them a fairly large number of necessary products and accessories. This means that on the spot, in order to save the client’s precious time, you need to clearly know what is in your purse or toiletry case. That is why many well-known brands in the beauty industry have supplemented their accessories with a variety of cases, bags and travel bags. Let's look at the types and purposes of various beauty cases and important parameters that you need to pay attention to when buying the suitcase you need.
Cute bonbonnieres
Bonbonnieres are a special type of boxes. Bonbon in French means candy, and the name of the boxes comes from the word “candy bowl”. It is the bonbonnieres with candies or sweet dragees that the newlyweds give to their guests at the wedding - in response to congratulations. Ordering a bonbonniere to be made for each guest is not a cheap pleasure. But it won’t be difficult for the bride and her bridesmaids to make bonbonnieres in the style and tone of the wedding.
Elegant.
They resemble a box or a small chest. Just a little more difficult than the first ones. We make slits in them with a stationery knife, holes, if we want to pull in a ribbon or lace, with a hole punch.
Unusual and tasty.
As a rule, bonbonnieres are located on a special separate table and often on a dish or tray. You can beautifully play with this situation and make bonbonnieres in the form of pieces of cake. And you need to place them together, as if it were a paper cake.
First, we draw a large circle (the plane of the cake) and divide it into sectors in order to know the parameters of our pieces. Then, according to the dimensions, we draw a diagram of the development of the piece. We make the required number of developments, cut them out and glue them together. You can decorate before gluing, or after - it all depends on the idea of your decor.
This is what the undecorated cake should look like:
And here are the finished decorated cakes with bomboniere pieces:
What to look for when purchasing?
If you decide to buy a stand for manicure products, pay attention to some nuances.
- Capacity. Buy an organizer that will fit all your products plus 5 more bottles. There is no point in buying a structure that is too large for home use. It will take up a lot of space and will be expensive.
- It is better if the shelf has sides. You can place bubbles on them at an angle. This allows the polish to flow into one corner and allows you to use every last drop of coverage. In addition, the sides protect the bottles from falling on the floor.
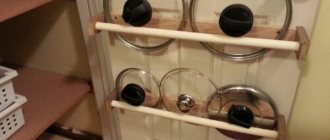
- Additional holders. Mounts for brushes, files, scissors, and stands for special care products are useful for those who like to keep manicure accessories organized in one place. It's comfortable!
convenient stand for varnishes
Home coasters
You can put your varnish storage in order using various stands, drawers or shelves. Buying a ready-made holder or using a creative approach by making a stand from scrap materials is a matter of taste for every owner of multi-colored bottles. Options may vary depending on the size of the varnish collection.
Ready-made stands
Many cosmetic companies offer to purchase ready-made stands for varnishes. You can order the stand you like in an online store specializing in manicure accessories.
Types of varnish stands:
- Wall shelf
- Multi-tier stand (slide, steps)
- Horizontal single-level
- Vertical stand
Stands are available in various materials:
- Polycarbonate
- Plexiglas
- Acrylic glass
- Tree
- Plastic
Each material has its own advantages and you should choose a stand based on personal preferences. Plexiglas stands can withstand good loads and are suitable as an exhibition stand. Transparent synthetic materials look stylish and make it possible to see the entire color palette of varnishes.
Wooden supply in the form of vertical shelves is convenient from the point of view of practicality and durability, and also because it can be painted in any color. This stand can be hung on the wall using fasteners or placed on a table.
Manufacturing process
First you need to prepare the surface of the cans for work.
Will the museum of Lady Lamp, who was a nurse in Crimea, be closed due to debts?
A friend taught me how to make a chocolate “Cube” with filling: a simple recipe
You can’t relax in these: what US beauty salons were like in the 1950s-1960s.
- Tear off all tags and stickers, both inside and outside. If the paper is difficult to come off, use white spirit, which will neutralize the glue. Or leave the jars in water for several hours. If necessary, sand the surface with fine-grit sandpaper.
- Then spray the jars with a coat of white paint. It is best to use aerosols, since in this case the pigment spreads evenly. If you only have a brush at your disposal, then do not forget to lightly sand the surface after. Apply at least 2 coats.
Travel organizer for cosmetics
Cardboard furniture for a dollhouse: making the interior from improvised materials (54 photos)
The travel organizer is a fabric case with many pockets and compartments sewn onto it. It easily rolls up and unfolds if necessary. This organizer takes up little space and is very convenient for traveling. We will sew an organizer from felt. It is easier for beginners to work with, since felt does not require additional edge processing. We will need:
- 2 pieces of felt. First piece: length – 30-50 cm, width – 20 cm. Second piece: 2 cm longer than the first piece, width – approximately 10 cm.
- Velcro or tape;
- scissors;
- needle and thread.
Sew a travel organizer:
- Connect two pieces of felt so that one edge matches in length and width.
- Sew the smaller piece to the main one along the width edge.
- Sew the pockets without stretching the fabric (so that you can put mascara, lipstick or a brush there).
- Sew the remaining sides of the pocket along the length and width.
- Sew on some tape or Velcro to keep the organizer closed, and you're good to go.
Applying a marble pattern
- Fill a large plastic container with warm water. Then add a few drops of nail polish in several colors.
- Using a toothpick, carefully spread it over the surface to create abstract splashes.
- Put on gloves and pick up a tin can.
- Gently dip it into the water, turning it a little at a time. You will see how the varnish sticks to the surface, forming a bizarre pattern.
- Add a little more varnish to the water and repeat the same procedure with the lid.
Let the can dry for 24 hours and then coat it with clear varnish. You can experiment with a variety of colors and combine them in different ways. But keep in mind that the most “natural” patterns produce cream and white, as well as light green pastel shades.
I love how the resulting cookie boxes look in my kitchen. All the beauty is in the details.
Found a violation? Report content
How to cover a box with paper: master class
Let's find out how to make storage boxes with your own hands from paper. The cardboard product is a beautiful and simple project for smart organization of space. You can make a homemade paper box together with your children, as making it is not very difficult.
To repeat this master class, you need to prepare the following components:
- cardboard box for storing shoes;
- gift craft paper;
- pencils;
- scissors;
- ruler;
- adhesive solution;
- rag.
Kraft paper is shown in the photo.
Now let's look at the process of how to make a beautiful and decorative box:
- Place the box on the paper and trace the outlines. Then cut out pieces on each side, leaving a margin of 1-2 cm.
- For better gluing, make cuts in the corners , as shown in Figure 1.
- Glue the two opposite sides first, and then the rest.
- The protruding parts of the paper are glued from the inside of the box.
- The bottom of the box must be carefully glued.
- Then the box is glued from the inside.
ATTENTION: When gluing paper, use a rag to smooth out wrinkles and bubbles.
The result is a beautiful box with a smooth and even surface.
Storing nail polishes
Girls are such girls! First we create a problem for ourselves, and then we try to solve it)) For example, nail polishes - almost all of us love bright manicures. We paint our nails either to suit our mood or to match the color of our new handbag, and ask the artist to paint deer for the New Year and flowers as soon as the smell of spring begins. And even if you don’t have time to go to nail salons, and you’re too lazy to paint your nails at home, each of us has several bottles with our very favorite colors. And the VseNaMestakh team became curious again - how the storage of varnishes and manicure accessories is organized for the most ordinary girls. There will be many options further!
Storage in baskets, boxes and other “improvised means” I’ll start with myself: Several years ago I ended my “quiet obsession” with varnishes, when I was interested in painting my nails every 2-3 days in different colors, drawing patterns and choosing a design to match the color wardrobe items. Now almost all the colors have somehow disappeared from my reserves (and there were purple and orange, even blue and green shades!), now I, as an inveterate conservative, cut my nails short and paint them exclusively red! And I keep a small collection of red shades in a small basket in my dressing table drawer. There are also several bottles with base and clear coat, nail polish remover and cotton pads, and a separate basket with various files and other manicure items.
Based on the results of a survey of my girlfriends, acquaintances and colleagues, it turned out that many store their “paint and paint” stocks in this way. Storing polishes in baskets and boxes is very convenient - the bottles don’t roll all over the box, a feeling of order is created, and it’s convenient to take the box out into the light and choose the desired color.
Here’s what the girls themselves say about this storage system: Alena: “I have a sad story with varnishes - I don’t like them, and they don’t like me. But I still have a few bottles, I keep them in a tin tea box in the kitchen table drawer. There is also a manicure set. It’s convenient for me to do a manicure in the kitchen because it’s light and there’s water.”
Tanya: “I keep it on a shelf in the closet in a box from some kind of souvenir. True, all the varnishes no longer fit. On the one hand, it’s convenient - everything is in one place, on the other hand, there’s the problem of finding the right color and an ever-increasing number of bottles. I want to find a more rational storage solution!”
Oksana: “The green box contains the polishes that I actively use now. In the distant are those that are awaiting their fate: either they will be given as a gift, or their season will come. There are also all sorts of manicure items and remover. My life hack is tiny ceramic mugs for liqueur - I pour nail polish remover or nail polish thinner into them. And when the nails are already painted, I correct crooked lines or smudged polish. I dip a flat brush and straighten it.”
Anya: “My varnishes are stored in a wooden box made from some kind of cognac bottle. The box is getting a little small, but I don’t want to change it – now it’s so neat and beautiful!”
What other storage options are there? Homemade organizers. If you are a creative person and like to make all sorts of interesting things for decoration and interior, then shopping baskets and boxes will probably seem too boring and ordinary. After all, you can make a varnish storage system with your own hands! The simplest thing is to cover a cardboard box of suitable size with wrapping paper and make dividers in it. On the Internet you can find interesting ideas for such options and even detailed master classes with complex multi-level designs.
Natalya: “This, of course, is not the limit of perfection, but now my entire collection of varnishes is stored compactly and all colors are visible. I saw the idea on the Internet and modernized it for myself - it’s a box from scales, which I supplemented with thick cardboard shelves and covered with oilcloth.”
Olya : “My hands are crazy! Once I bought assorted cookies in a box with compartments and the idea came by itself! I didn’t change anything inside, but I lined the sides with satin and made all sorts of decorations - I store in this organizer not only polishes, but also cosmetics, everything is in one place and looks beautiful on the chest of drawers!”
A worthy alternative to handmade boxes are ready-made universal organizers with dividers. They can be plastic, wooden or fabric. Such organizers can be found in household and construction departments, ordered in the VseNaMestakh online store, or wait for a package from China.
And for the most picky manicure lovers, there are special professional cases and storage boxes : huge suitcases, plastic boxes with compartments or small acrylic stands and special shelves - all this can be found in specialized manicure stores. The sad downside of this storage system is that these items are quite expensive.
Inna: “At first it was a hobby, and now I earn extra money by doing manicures at home. Here I have the only place where there is order and harmony. All bottles are stored in a professional acrylic stand on a special bedside table on wheels. All the liquids and tools for manicure are right there.”
Galya: “I ordered a shelf for varnishes to match the size of my cabinet from a company that makes all sorts of things and display cases from plexiglass.”
Let's take a look into the bins of the lacquer maniacs? What if there are not 2-3 bottles of varnish, but 10? What if 50? Or even a couple hundred? Do you think that so many polishes can only be found in a manicure salon? It turns out that there are real polish maniacs (the girls call themselves that) - they collect entire collections of polishes from their favorite brands, chase limited editions, mix colors from different jars, share their impressions and exchange their treasures. Among my friends there are girls like this and, surprisingly, not one of them has a convenient storage system - nail polishes gather dust on open shelves, occupy entire dresser drawers, stand in assorted boxes in the closet...
Lucy: “Laaakiiii! They stand on two open shelves and regularly fall from there, gather dust, you can’t see all the colors at once... Of course, there is some kind of organization system here - all the varnishes are arranged by brand (I remember what color I have from which brand, I’ve never duplicated did not buy). Ideally, I want narrow shelves so that the varnishes stand in one row, and then I will measure them by meters!”
Tatyana: “This is chaos! My polishes are everywhere - in the dresser, on the dressing table, in the bathroom cabinet, stuffed into all cosmetic bags and bags. I really don’t remember where I have which polish, and I spend a lot of time looking for it! It’s infuriating!”
Olya: “I’ve dedicated a whole drawer to polishes in the chest of drawers, there are additional boxes in the drawer, I’m sorting, arranging, and still I can’t see where anything is!”
What options? But the girls were happy to share their ideas and Internet finds that they would someday implement. Lucy: “This is my ideal! Beautiful, compact, everything is in sight! Whenever you get around to making something like this... I saw it on Aliexpress, but I think you can build it yourself. I'm waiting for inspiration!
Tanya: “I dreamed of a special case, but it costs so much! On one forum I saw an amazing idea: a girl uses a suitcase to store miniatures for board games. It is not just big, but huge - in a standing position it reaches to the knees, and at the same time it is made of light plastic, there is even a shoulder strap, the latches are reliable. But the most important thing is what is inside! There are six foam inserts with forty cells each! Foam rubber stretches, holds bubbles well, and the partitions can be cut out and moved to the right place. All you have to do is tune in and place your order!”
Olya: “I found a simple master class online - you need to buy small magnets (I saw “everything for the holidays” in stores) and glue them with superglue to each bottle of varnish. And attach the bubbles to an iron sheet, or even to the refrigerator!”
Oksana: “I can’t sleep peacefully now - I want to do the same: I saw a picture where the varnishes are stored in a thick office folder with ties - it looks like such a strong box-box. Tall bottles probably won’t fit there, but most of my polishes will like this move.”
The girls gave me more ideas:
- cosmetic bags for storing polishes sometimes appear on sale they can be compact (for several pieces) or quite spacious (a hundred bottles can easily fit in).
Svetlana: “I noticed an unusual cosmetic bag in the catalog a long time ago. They'll come up with something like this - a handbag with a bunch of compartments! I bought it and ended up using it as an organizer for my nail polishes - a lot fits into it, and when folded the cosmetic bag takes up little space. An undeniable advantage of such storage is that the varnishes do not delaminate, because when I open/close a cosmetic bag, the bottles constantly change their position - sometimes they lie on their sides, sometimes upside down. It’s better than them just sitting motionless on a shelf.”
Olya: “A mini cosmetic bag for several bottles - and even in another country I can paint my nails to suit my mood!”
- The famous dress-shaped jewelry organizer with many pockets . Lacquer lovers have adapted it to their needs, the main thing is to make sure that it is securely attached to the bar!
A collection of nail polishes can become an interior decor item.
- From the remains of moldings or ceiling plinths you will get small narrow shelves that can be painted in the desired color scheme.
- These same shelves (or narrow boards) can be placed in a beautiful baguette - why not a picture?
- Nice touches include multi-tiered cupcake stands. Who said they're only good for treats?
That's how many different ideas and options we could find! What storage systems have taken root with you? Or which options did you like best?
Beauty Salons
Professional manicurists working in hairdressers and beauty salons own a large assortment of nail polishes. This is necessary to please any, the most demanding taste of clients and help them create a complete, harmonious image.
The entire collection of nail polishes should be placed in such a way that visitors can appreciate the variety of colors.
How to store polishes in beauty salons? For this purpose, ready-made stands, stands and displays are used, which are produced both according to standard sizes and to customer sizes.
Types of stands:
1. Wall shelf for open type varnishes
Hanging shelves are mounted on the wall directly next to the working manicurist or, if desired, can be installed on his desk.
2. Shelf-tray made of transparent plexiglass
The trays are made of transparent plexiglass with the ability to be mounted on a wall and are equipped with a rear wall with a side at the front.
3. Wall-mounted chest of drawers with shelves closed with transparent doors.
This type of storage is suitable for salons that not only provide manicure and pedicure services, but also sell varnishes.
4. Multi-tiered shelf (slide)
Transparent stands for displaying and storing polishes in the form of a slide with several tiers of steps are placed on the table of the manicurist. They come in a straight type or with an angle that allows you to clearly see the shades of varnishes and use them to the last drop.
5. Display for varnishes with a showcase-type lid (closed with a lock)
Displays with a locking lid are needed for retail outlets or for storing expensive varnishes in salons.
6. Straight stand (shelf) for varnishes
Stands (shelves) for straight varnishes with several tiers are designed to organize a manicurist’s workplace. Manufacturers offer options equipped with a wide bottom shelf for bottles of creams and liquids. The lower tier is required to limit the space on the table.
Some manufacturing companies produce small seasonal collections of varnishes (4-12 pieces), complete with a stand for them, equipped with an insert with a company logo. It is better to store such collections separately so that visitors can see all the fashionable new items.
For manicurists who work on the road, it will be convenient to have a special portable box or suitcase that will accommodate not only varnishes, but also tongs, files and other necessary accessories.
We make devices with our own hands
You can make useful homemade crafts for your home using materials that are available in abundance in every home and purchased magnets. In addition, you will need your imagination, ingenuity and a little skill.
Magnets
It’s quite convenient to store spices in containers with magnets, and the price is quite affordable. You can make these spice jars with your own hands. For this we need:
- plastic jars with lids;
- magnetic sheet;
- pencil;
- scissors;
- Super glue.
Count the number of jars available and make the same number of circles. To do this, trace the bottom of the jar on a magnetic sheet and cut along the contour with scissors. Glue the resulting magnets to the bottom of the jars and let dry. The jars can be attached to the refrigerator or to a special magnetic board. Such DIY tricks can be entrusted to children to paint.
A magnetic sheet is a great idea for recording recipes and reminders.
Pockets
Cutlery is stored in drawers or in stands. But you can use hanging pockets for these purposes, which will not only save kitchen space, but also add uniqueness to the interior.
For production you will need:
- pieces of fabric;
- wooden planks;
- braid;
- scissors;
- sewing machine or needle and thread;
- stapler;
- glue.
During operation, follow the instructions:
- Take a thin piece of wood. Attach a piece of fabric to it and cut out the pattern for the future pocket, not forgetting about the allowances. Finish the top edge using a sewing machine or by hand.
- Attach the fabric to the board on three sides with a stapler, fold the edges.
- To be sure, go through the stapler again.
- Hide the staples under the braid. To do this, apply glue to it and press it firmly to the fabric.
Round box
Next, we will look in detail at how to make a round gift box. Most often, romantic gifts are given to loved ones in round boxes. If you are planning such a case, then we have prepared interesting material for you.
It's actually not difficult to make a round box. For work you will need: thick cardboard, scissors, glue, a template is not needed in this case.
So, take a long piece of cardboard and try to make it as natural a circle as possible. After that, carefully fasten the 2 ends of the cardboard.
Then take another piece of cardboard, place it under the bottom of the structure and draw a circle with a pencil. Then all you have to do is carefully cut it out and glue it on.
The final stage of work will be decorating the gift box.
Well, now you know how to make a round cardboard gift box. By doing it, you will not only save a good amount of money, but you will also be able to pleasantly surprise your loved one. The best gift is the one made with your own hands!
How to properly store varnishes?
If you experiment with manicure quite often, then you have probably already encountered certain problems when bottles are regularly opened, varnishes begin to thicken or even dry out, despite the high-quality composition. To maximize their service life, follow these simple recommendations.
- Nail polishes should be stored in a cool place. Many girls, taking this fact literally, place bottles in the refrigerator using door shelves. This is strictly forbidden ! Under the influence of cold and temperature fluctuations that occur when the door is systematically opened, water condensation forms in the bottle, and the nail polishes become unusable. To preserve your collection, you must also avoid direct exposure to sunlight. Ideally, varnishes should be kept in a closed drawer or box.
- Before putting the bottle into your “storage” after a manicure, always check it for leaks. The lid must fit tightly, otherwise air will get inside. If you notice dried pieces of composition on the neck, be sure to remove them with nail polish remover using a cotton pad. It is advisable to carry out this procedure after each manicure.
- One little trick will help extend the life of varnishes. Before tightly capping the bottle, blow into it a little. The air that managed to penetrate into the bottle while painting the nails will be replaced by carbon dioxide.
If the described actions are carried out systematically, nail polishes do not deteriorate so quickly . To make it convenient for you to store your collection of decorative coverings, we invite you to familiarize yourself with the devices designed to make your life easier.
Source of the article: https://yapomoshnik.ru/dom/korobka-dlya-lakov-nogtej-svoimi-rukami.html
What can it be made from?
Various types of materials are used to make organizers. What materials are suitable for the kitchen:
- Tree. The kitchen space becomes cozy and homely if the interior contains objects made of wood: kitchen furniture, shelves, cabinets. Wood is an environmentally friendly material, but it does not tolerate high humidity.
- Plastic. Containers, trays, and stands are made from high-quality plastic. Plastic is resistant to thermal and mechanical damage, moisture resistant, but fungus may appear on plastic objects.
- Metal. Spice racks, dryers, towel holders, rails and other organizers are often made of stainless steel. Metal objects fit perfectly into the high-tech style, but require some care. After contact with water, stains may remain, so you should carefully wipe metal products and use special cleaning products.
What materials are best avoided:
- Chipboard. Despite the fact that budget kitchen furniture options are made from this material, it is the most short-lived and fragile. In addition, chipboard contains harmful chemical compounds that begin to evaporate over time. Chipboard quickly gets wet, completely absorbs moisture, which is why it quickly loses its original appearance.
- Low quality plastic. When choosing organizers for storing kitchen utensils, do not buy products made from cheap, low-quality plastic. They will quickly lose their appearance, fade, and become covered with stains that cannot be removed. It should be noted that some products made from low-quality plastic are coated with cheap paint that contains harmful substances.
Wood
Metal
Plastic
How to tell if your spices have gone bad
Dried herbs and spices don't actually expire in the traditional sense, and they don't spoil.
When a spice is said to have gone bad, it simply means that it has lost much of its flavor, potency, and color. Fortunately, eating spoiled spice is unlikely to cause any harm.
Store-bought spice packages are labeled with expiration dates, which indicate the length of time they will retain their strongest flavor and quality ().
In general, spices that have passed their expiration date can still be safely consumed, although they will not add as much flavor as their fresh counterparts.
If you don't know how long your spices last, you can tell if they need to be replaced by their smell and taste. Crush or rub a small amount of spice into your palm. If the smell is weak and the taste is dull, it's probably time to replace it.
Rules and terms for storing spices in the kitchen
First of all, it is worth noting that spices cannot stale, rot or deteriorate so much that they become unsuitable for food.
The only thing that can happen to them is loss of taste and aroma. And this is much more offensive than mold on the seasoning.
Therefore, when replenishing your set of spices, be sure to look at the date of manufacture and promptly update the contents of the “jars,” bags or bags.
Remember that the shelf life of spices in powdered (ground) form is several times lower than that of whole spices.
- For whole spices: 1-2 years for flowers and leaves, 2-3 years for seeds, and 3 years for roots.
- For ground ones: 1 year - for leaves and seeds, no more than 2 years - for root vegetables.
- The leaders in terms of shelf life are pepper, cloves and the beloved cinnamon.
As for storage rules, they were invented back in the days when every spice was worth its weight in gold.
They haven't changed since then:
- Spices should be stored in containers with tight-fitting lids. For example, in ceramic, glass or tin containers. It is not recommended to leave this “kitchen gold” in bags due to their absolute leakage after the first opening of the package.
- If you buy whole spices and then grind them, you should not grind the entire volume at once - store them in their natural form and grind exactly the amount needed to prepare the dish. This way your spices will “live” much longer (especially nutmeg, cinnamon sticks, cloves). To compare the aroma, you can conduct an experiment on storing ground black pepper and peppercorns: the latter, even after six months, will remain fragrant after grinding, while the ground one will lose its “freshness” and pungency.
- Hide spices from the light! Do not place your precious clear jars in direct sunlight. It is better to choose opaque containers and put them in a dry and dark cabinet.
- Do not dip a wet spoon into the spice jar. And don’t climb there with wet fingers (and you shouldn’t use dry ones either). The seasoning loses its properties after getting wet, in addition, the formation of mold is quite possible. This advice also applies to those housewives who pour seasonings into a saucepan, holding the jars over steam - this should not be done for the same reasons. Use a knife or spoon.
- Individual spices/condiments are stored exclusively in the refrigerator. For example, seasonings based on paprika or chili. It is in the cold that their wonderful taste and aroma are preserved. You can also put sauces and vinegars, herbs, aromatic herbs, celery and ginger in the refrigerator. Other spices, on the contrary, do not like cold.
- To avoid the colonization of your spices by various insects, you can place a bay leaf on top of the seasoning in each container.
- Keep spices as far away from the stove as possible. Many people like to beautifully arrange jars over the stove so as not to waste time searching, but this storage method significantly worsens the properties of spices.
- Once every few months, do a complete audit of the spices in your kitchen. Check their freshness, aroma and shelf life.
- Place those spices that contain oil in the freezer (note: sesame seeds, poppy seeds, etc.). This way you will avoid them going rancid.
By the way, many of the spices and seasonings are natural antibiotics.
Pockets for small items or how to sew a children's organizer
This children's organizer is especially suitable for use in the garden. The cabinet doors there are very narrow and it is difficult to find a suitable holder in the store. In addition, you decide for yourself how many and what size pockets there will be. Here the top ones are for underwear, T-shirts and socks, the bottom ones are for sportswear and shoes.
Based on this master class, you can sew an organizer or, for example, pockets for small items on a crib. How to calculate fabric consumption if you want to sew according to your measurements is written at the end of the material.
Tools and materials for sewing a children's organizer 25×60 cm
- Thick felt (3 mm) 25×60 cm and two pieces 2×8 cm
- Fabric 33×114 cm and binding 4×180 cm (or finished binding 1.8 m)
- Velcro tape (Velcro) 2×4 cm
- Threads
- Needle
- Eyelets 2 pcs
- Cord
- Scissors
How to sew a children's organizer
We cut the fabric into 3 pieces, each measuring 33x38 cm.
Fold in half to form a 3 x 19 cm rectangle.
Sew along the long side, 1 cm from the edge.
Turn it inside out, iron it, and stitch close to the fold.
Now let's form the pockets. We form one pocket on two parts, and two on one. The fold should be at the top.
Stepping back 0.5 cm from the edges, lay folds 2 cm deep and iron.
To form two pockets, we retreat 0.5 cm from the edges and lay folds 1 cm deep. Divide the resulting pocket into two parts (here one pocket is 10 cm, the other is 14 cm). Stepping back 10.5 cm to the right, we lay two opposing folds 1 cm deep. Iron.
We lay out the pockets on a felt base. For convenience, you can baste.
We sew pockets on three sides. We do not sew the folds on the sides. Place a stitch between the folds to secure the two pockets.
- We trim around the perimeter with trim.
- We place the binding on the felt face down, pin or baste it, and sew a line at a distance of 0.5 cm from the edge.
- We turn the binding over to the wrong side of the base, turn it over and hem it (here by hand with blind stitches).
We install eyelets in the upper corners. We tie the cord.
The pockets are ready. If desired, you can sew flaps onto large pockets to prevent the contents from falling out (relevant if they will hang on the cabinet door).
- We will need two pieces of thick felt 2x8 cm (can be made from fabric) and two pieces of Velcro 2x2 cm.
- We sew the Velcro parts with hooks to the felt, and with the soft side to the pockets.
- Sew the felt to the base.
- If you hang it on two nails, the corners will not bend.
Reminder: if you want to sew pockets to your own size, here is the formula to calculate how much fabric is needed for one row of pockets: Width = base width + 4 fold depths x number of pockets
Height = 2 heights of finished pockets + 2 cm for allowance.
Budget organizer option
You have already seen that you can make an office organizer with your own hands without much effort and financial expense. You can easily find a master class on the global network. And if you know how to think creatively, come up with your own version. For example, you can make an original cup from a tin can. Decorate it at your discretion with any accessories. To avoid being irritated by the sound of pencils and pens hitting the metal bottom, cover it with viscose fabric.
Make this a fun and super convenient box organizer, perfect for displaying and storing your ship supplies and desk accessories. Apply artist's tape of your choice to the outside of the drawers. Start painting on the outside of the box and leave it dry.
DIY dream catcher - jewelry organizer
Now apply masking tape to the back of the box in the design of your choice. Paint the inside of the drawer in the color of your choice. Paint the edges of the box with a complementary color and set to dry. For a design that pops, try a complementary neon color.
Step-by-step description of the creative process:
- To create an organizer, any can of canned food, such as green peas or sweet corn, is suitable.
- We thoroughly wash and dry the jar.
- The edges of the tin can must be bent well with pliers to avoid injury.
- Now you can start getting creative. Tip: Do not remove the paper sticker from the jar, this will make it easier to decorate.
- Take decorative paper and measure the tape to the height of the can.
Repeat steps 1 and 2 with other fields. Apply a thin coat of paint to each bulldog clip in the same color as the edge of your boxes. Allow the paint to dry completely before applying the next coat. Use bulldog clips to join the boxes together. You can arrange your boxes in any design. Try stacking them on top of each other, or placing them in a row diagonally and connecting them together.
Ok, your box organizer is now ready for storage! Use a bunch of boxes to maximize your office to its full storage potential or choose a few boxes for small storage. Your new colorful containers will help reduce desk clutter.
Glue it to the jar and let it dry for 10-15 seconds. Now we coat the second part with glue and glue it. To ensure that the decorative paper lies flat, smooth it with your fingers and press. We pay special attention to the joints; they must be well saturated with glue.
It's compact enough for small spaces and provides space for everything. It is very convenient for storing ship accessories and over time, you can easily rearrange and add more boxes to suit your needs.
What do you think of my storage solution for your desk? Do you have any other clever storage ideas? Read on to know how! Rule Pencil White tail brush. The first step to start creating your work organizer is to measure the template using a ruler and pencil. Remember to leave enough space on the edges of the templates to ensure it is secure enough when your desk organizer is finished. When you have all the templates checked and cut out with your chosen measures, you are wondering what is the second step in how to make an organizer.
- The sound of objects hitting the metal bottom will become annoying over time. There is no need to stress yourself out and take sedatives; it is better to prevent this right away.
- We take viscose fabric, maybe a kitchen napkin, trace the bottom of the jar and cut it out.
- Glue viscose to the bottom.
- Our organizer is ready. We built an unusual stand for stationery items simply, quickly and cheaply.
Long-term storage of spices
Long-term storage of spices, for example, in reserve, is best done in vacuum bags. This method is optimal from all points of view: it eliminates contact with air, which during long-term storage can cause changes in the taste and aroma of spices. Vacuum bags prevent the smell of spice from permeating surrounding objects.
Typically, spices, which are dried, sometimes crushed parts of plants, are not a perishable product. Therefore, there is no need to keep them in an absolute vacuum. Simply release excess air from the bag and secure the bag closed with a clip, clothespin or any other device.
If necessary, spices can be stored in this form for years. True, for successful storage of spices in this state, certain conditions must be met: when packaging, the contents must be absolutely dry, and the packaging process itself must be carried out at low air humidity.
Otherwise, when packaging a damp product, it may change its taste and aroma qualities over time.
Children's organizer for the car
You can also make a children's organizer that is easy to take with you on the road, usually using fabric. In the niches of such an organizer it is convenient to store toys, feeding bottles and baby care items. You can sew such a product by hand or using a sewing machine. To work you need to prepare:
- fabric for base;
- material with children's drawings;
- mesh fabric;
- elastic band for fastening.
You can start manufacturing. First you need to cut out a rectangle from the main fabric. It should be the same size as the back of the front seat of a car. Then cut out pockets from fabric with a child's design and sew them onto the base in any order.
To close the pockets, you can sew buttons on them. Make an insert of mesh fabric in the upper part. You need to stitch it from the bottom and divide it into sections in which you can put toys. All that remains is to sew elastic bands on top and bottom. The organizer is secured to the car seat with rubber loops. When sewing, you need to make sure that all seams are strong and can withstand the weight of toys and other items.
As you can see, the process of creating storage systems is not very complicated. You just have to look for suitable material among unnecessary things, and you can start creating. Nowadays it is very easy to buy any thing. But the value of a product increases when it is created with your own hands. Fill the space around you with original and useful things.
What containers should you store spices in?
Most types of spices are sold in sealed paper, foil bags. Suitable packaging, but only for opening. Houses need to be rebuilt immediately. You can’t tear off a corner, throw it away, or throw it in a box. The contents of the sachet will expire during storage. We make it a rule to immediately transfer it to another container. And be sure to close tightly after each use.
Suitable container:
- glass jars;
- ceramic containers;
- sealed bags.
Not suitable:
- plastic bags;
- fabric bags;
- plastic.
Many housewives use plastic containers. They reliably protect from foreign moisture. Only the material absorbs the aromas of other products and then releases them. Plastic can also release its synthetic odor. Hindus believe that magical additives should be kept exclusively in natural materials. For this reason, polyethylene is rarely used.
Glass jars are ideal for storage. They reliably protect from moisture. When kept indoors, it is not necessary to buy special containers. An excellent temporary solution is jars of baby food and various sauces. If necessary, remove the label and decorate the surface.
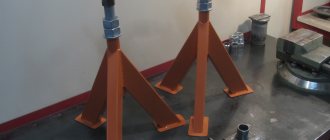
Previous Storage systemsOptions for making a garage rack Next Storage systemsDescription and production of shelves for wine