How 3D shooting works
You may be interested in: How to control your TV from your phone: recommendations
Photogrammetry uses a series of ordinary two-dimensional photographs taken from all angles around an object. If a point on an object can be seen in at least three photographs, its location can be triangulated and measured in three dimensions. By identifying and calculating the location of thousands or even millions of points, the software can create an extremely accurate reproduction.
Unlike a hardware scanner, this process has no size or resolution limitations. If you can photograph an object, you can scan it:
- The limiting factor in photogrammetry is the quality of the photographs and therefore the skill of the photographer.
- Photos must be clearly visible and clearly focused.
- They should also be placed around the object so that every part of them is covered.
Without a 3D scanner, you can only make 3D images of large objects. Small items cannot be scanned. To understand this in more detail, let’s look at the concept of photogrammetry.
Iron
To obtain a three-dimensional model using photogrammetry, any digital camera is suitable. Obviously, professional DSLRs give noticeably better results simply due to higher quality optics. In addition, such cameras allow you to import images in “raw” RAW format, that is, without compression, which provides a certain advantage when processing images, since graphics compression inevitably results in losses. But in general, to achieve an acceptable result, a camera that is equipped in almost all modern smartphones is quite sufficient, provided that the camera lens itself has no physical damage or defects. The general principle here is this: the higher the resolution of the resulting images, the higher the quality of the three-dimensional model will be, but the more time will be required for software processing of frames.
Action cameras like GoPro are not very suitable for photogrammetry purposes, since most of them are equipped with fisheye lenses, which introduce distortions into the image captured by the camera. This negates all the advantages of such devices.
That is why it is quite possible to use a regular webcam as a device for obtaining images instead of an action camera, since they are the basis of most budget 3D scanners. The quality of the time-lapse photography obtained in this way will, frankly, be so-so, but in this way you can shoot quite large objects - for example, architectural structures or cars.
What is photogrammetry and how does it affect the display of objects?
You may be interested in: Hair dryer for curling: review of the best models, characteristics, reviews
Photogrammetry is the science of obtaining measurements from photographs, especially to reconstruct the exact positions of points on a surface. It can also be used to reconstruct the motion trajectories of designated control points on any moving object, its components and in the immediate vicinity of the environment.
In short, it provides the ability to create a 3D mesh from multiple photos by comparing similarities between images and triangulating them in 3D space.
Photogrammetry has been around for a while, but it wasn't until Autodesk jumped into its Memento beta program that things started to work consistently. Memento was renamed ReMake when it left the beta phase. Sounds like magic, right? Well, it's not magic, it's reality. Now anyone can do 3D scanning without spending hundreds on a scanner. Even affordable open source 3D scanners require quite a bit of knowledge to get them to work properly. With photogrammetry, anyone can get what they want.
Making a 3D scanner from a game console
Xbox One is a console that is already equipped with a second generation Kinect and can be used as a 3D scanner. If you have a regular game controller, then you can make a 3D scanner from kinect using the following programs:
- Kinect Fusion. Creates highly detailed models by reading data from Kinect sensors.
- Skanect. With its help, 3D images of rooms with all the objects that are in them are created. To create a three-dimensional model of the surrounding space, you simply need to rotate the device around you. In order to detail individual objects, it is necessary to point the camera at them again.
Turntable - the second stage of creating a scanner
All you need to create your own 3D scanner is your smartphone, the included headphones and a player. Here's how it works: You turn the crank, and for every full rotation of the turntable, the phone's camera is triggered by the volume of the headphones 50 times.
You may be interested in:Audiophile headphones: rating, review of the best models
Just! Transfer your photos to your computer, then use Autodesk ReMake to work its magic. Surprisingly, it not only creates a mesh well, but also provides tools for adjusting the mesh, repairing holes, alignment, preparing for 3D printing, or serving as a system mold as a 3D resource for games or renderings!
Well, given that Apple removed the headphone jack for the iPhone 7 and above, an updated version of the scanner creation will be used. It is based on the principle of trigger operation for a Bluetooth camera. This will replace the need for a headphone jack.
- High-quality photogrammetric scanning requires high-quality photographs of the subject from all angles.
- The simplest approach for scanning small things is to rotate the object as you take the photo.
- To do this, the scanner uses a stepper motor controlled by an Arduino board.
- The stepper rotates the object a fixed amount, and then the infrared LED goes out in a fiendishly clever series of blinks that mimic a camera's wireless remote control.
An LCD screen with a set of buttons allows the user to control the Arduino. Using the buttons, the user can select the number of pictures to be taken per revolution. A high-quality DIY 3D scanner can operate in automatic mode, where it takes a photo, advances the stepper motor, and repeats until it completes a full rotation.
There is also a manual mode where each button press takes a photo, moves the stepper and waits. This is useful for scanning parts. The 3D scanner focuses on the frame that frames the image.
Making a 3D scanner using a webcam
In order to make a homemade 3D scanner, you will need:
- high-quality webcam;
- linear laser, that is, a device that emits a laser beam (to obtain a high-quality scan, it is better that the beam be as thin as possible);
- various fastenings, including an angle for calibration;
- special software for processing scanned images and data.
Please note that without the appropriate software you will not be able to create a digital model of objects and objects. Therefore, initially take care of the availability of special programs. For example, DAVID laser scanner and TriAngles are considered basic, but they require the use of a rotating surface.
Start with the calibration angle. To create it, print a template (it is included with the program). Place it so that it creates a 90 degree angle. It is important that the correct scale is maintained during printing. To do this, use a calibration scale. The camera is calibrated automatically or manually; this is also provided by the software.
To scan an item, you will need to place it in the calibration corner, and install a webcam opposite it. It is important to place the object exactly in the center of the image on the screen. In the webcam settings you need to disable all automatic adjustments. They also help set the color of the laser beam. By pressing “Start”, smooth movements are made. The beam needs to circle the object from all sides. This will be the first scan cycle. In the future, it is necessary to change the position of the laser in order to cover all points that were not previously processed.
Upon completion of all processes, scanning stops and the “3D display” mode is selected in the program. If you don't have a laser on hand, you can replace it with a bright light source. It will ensure the projection of the shadow line. However, in this case, change the settings in the program that will correspond to these parameters.
Additional software
When photogrammetry software detects a feature in a photo, it tries to find that feature in other images and records the location in all the photos that appear.
- If the object is part of a rotating object, we get good data.
- If the detected feature is in the background and doesn't move while the rest of the object is being scanned, it can cause a disruption in the space-time continuum, at least as far as your software is concerned.
- One is to move the camera around the subject so that the background remains in sync with the movement. This is good for large objects, but it is much more difficult to automate the process.
- A simpler solution is to leave the background without features. This is easier to do for small objects. Add to that the right lighting and you're well on your way to featureless backgrounds.
There are two solutions:
Another tip is to overexpose your images with a stop or two. This allows you to capture more detail in a subject's shadow while simultaneously isolating the background so any remaining background objects disappear into a brilliant white.
- "Arduino". It has pins that are not covered by the LCD screen, making it easy to connect.
- SainSmart 1602 LCD Shield, which has a display and several buttons to control the scanner.
- Stepper motor driver (Easy Driver).
A NEMA 17 stepper motor will rotate the scanned object. With a larger stepper motor (with appropriate driver and power supply), this high-quality DIY 3D scanner could scale up the scanning. A 950 nm IR LED powers the camera. Some popular models of hand-held 3D scanners are based on this principle. You can repeat the construction process with your own hands. We offer several options to choose from.
Creating a 3D scanner from a webcam, a laser, and a bunch of other radio components
Last year my friend and I attended summer school. It was necessary to make a project on it. After reading two articles about creating 3D scanners (one, two), we decided to try our hand at assembling it and, if possible, improve its design. We couldn’t even imagine what would come of it, much less imagine that we would win several scientific and engineering exhibitions with it. But in order. Who is interested in knowing the result, welcome to the cat (lots of photos).
First prototype
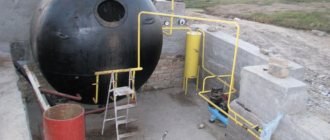
First we decided to build a laser rangefinder. It was made based on an article on an amateur radio forum. Just a laser pointer and a camera. A program was written in Java to process images. For one measurement, two photographs were taken: with and without laser. After comparing them, we could definitely find the laser point. Once this was working, the rangefinder was mounted on a platform that could rotate in two planes. Before I show you what I got, I need to warn you that the summer school doesn’t have a lot of materials, so we put together a prototype from what we had:
The camera is immediately visible, and the laser is that brass cylinder above it. To rotate the platform, we used two stepper motors, which in turn were connected to a control board on an Atmega32 microcontroller. The laser was connected to it. The board itself was connected to the computer via a USB->UART adapter. The program on the computer took pictures, processed them, entered the coordinates of the obtained points into a file and sent commands to the control board.
The result was interesting. Yes, we found the distance. Yes, we could “target” any point in the hemisphere above the scanner. And our joy knew no bounds. But when we assessed the scanning time for this hemisphere, it turned out to be 48 hours. And it's not about the camera. And not even in Java. The problem was that the installation was so flimsy that it wobbled after each turn for five seconds. I had to take a measurement, turn around and wait five seconds until it stopped swaying. And in addition, the library for the camera turned it on and then off before each shot. This took 1-2 seconds. But summer school was ending, and there was no time to redo it: it was already the night before the project was due. Or rather morning. The next day we presented our project at a competition in front of a scientific jury and unexpectedly won. It was probably because of this victory that we decided to continue our work on this project.
Version two
In fact, summer is over and the school year has begun. The desire to work disappeared. The installation was planned to be completed by the next competition, which was a whole month away. Month. And then suddenly three days. But within a month we decided to change the setting. Assemble it tightly, install a lens on the laser pointer, which will create a laser line. This would allow scanning 720 points at once (the scanner had an HD camera). Only three days have made their own adjustments:
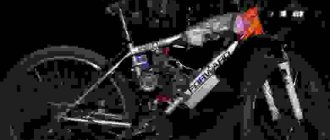
The second scanner is assembled from plastic rulers, glue, masking tape and is held in place only by blue electrical tape. Instead of a lens there is a test tube. A green laser shines on this test tube. The reflected beam creates a more or less uniform laser stripe on the screen. The rangefinder is attached to only one motor, which rotates it in a horizontal plane. The control board was replaced with STM32VLDiscovery. It’s just that I know STM32 better, and besides, Atmega burned out, and the programmer was lost a long time ago. It doesn't look very good, but it works! The vibrations decreased and the speed increased accordingly. But not much. A very interesting catch was discovered here - the Chinese laser pointer did not turn on immediately, but gradually increased its power over the course of a second. Thus, a second to oscillate, a second to warm up the laser, a second to take a picture, and there are two of them. So we get 4 seconds. But in one measurement we find distances of up to 720 points! The scanning process looked something like this:
And the result is like this:
The picture doesn't look very interesting, but the mug was voluminous in the program. You could look at it from different angles.
What is the actual competition? But nothing! We finished scanning everything at 4 am, and at 9 am at the stand we discovered that the laser had burned out. As it turned out, while we were carrying it from the hotel to the stand, rain got into it, and when turned on, it burned out. And when it’s not working, it looks so bad that it’s hard to believe the words “it worked 5 hours ago.” We were upset. The desire to continue disappeared with the smoke from the laser. But still it was collected...
Third version
And it was assembled again for the competition. Moreover, we prepared for it long and thoroughly. More than a week. And here is the result:
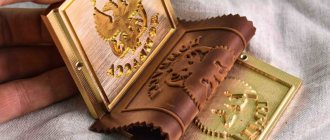
The first thing that catches your eye is that now we are scanning not the area around the scanner, but an object that is rotating on the platform. We also got the required lens, assembled everything correctly, rewrote the program, and also replaced the debug board with a homemade one. And now we only take one photo per measurement. The laser is powerful enough and the lens is good enough to uniquely locate the laser in a photograph. Thanks to this, we do not wait for the laser to warm up - it is always on. And now we turn on the camera only once. That is, time is spent mostly on rotating the platform and processing the image. A menu for selecting accuracy has been added to the program. Scanning time is from two to ten minutes. Depending on the selected accuracy. With maximum accuracy, it turns out that the platform rotates 0.5 degrees per step, and the distance is determined with an accuracy of 0.33 mm. The platform is driven by a stepper motor through a gearbox. The platform itself is a large disk, and the rubber roller on the motor shaft is small. The motor and laser were controlled by an STM32F050F4 microcontroller via field-effect transistors. At the very beginning of the article is a scan of the toy obtained using this scanner. Since the scanner produces a point cloud in .obj format, after triangulation we can print the scanned object on a 3D printer, as can be seen in the same photograph. On the screen we can see the model after triangulation. No manual work was done on the model.
We won the competition. And he gave entry to the international competition Intel ISEF. So we started working on the next scanner.
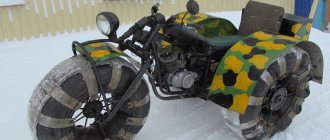
Fourth version
At the moment this is the latest version of the scanner that we have collected. For comparison, there is a second version on the platform. We tried to approach the development of the fourth scanner as thoroughly as we could. The installation was drawn in CAD, the parts were laser cut, everything was painted, nothing unnecessary stuck out from the outside. Changes: The platform is now actually a gear. It is cut out of plexiglass and has 652 teeth along the edges. This solves a problem that severely damaged scans in the previous scanner: the rubber roller would slip a little, which is why the platform often did not rotate 360 degrees. The scans were either “cut out” or overlapped. Here we always knew exactly how rotated the platform was. The laser power was made adjustable by software. Thanks to this, it was possible to change the laser power on the fly, avoiding illumination of unnecessary parts in low-light conditions. To control all the electronics, we decided not to build a new board, but simply use the debug F401RE-Nucleo. It has ST-LinkV2.1 installed, which works as a debugger and USB->UART adapter.
The accuracy was amazing: Angular resolution 0.14 degrees. At a distance of 0.125 mm. The scanning area is a cylinder with a height of 20 cm and a diameter of 30 cm. The price of all parts and laser cutting at the time of its creation (May 2014) was less than 4,000 rubles.
During use, we only set it to maximum accuracy once. The scan lasted 15-20 minutes. We received almost 2 million points. The laptop refused to calculate the model from the point cloud. The experiment was not repeated.
Conclusion
In the near future we plan to resume work on the project, and therefore we will finalize both the program and the installation.
I hope that in the near future we will write about step-by-step assembly, post drawings, programs and everything else. This will no longer fit into this article. Thanks to everyone who read to the end!
UPD: A colleague found a video about the operation of the scanner that we filmed at ISEF:
Yes, most of the video is not interesting, but at the end there is a model on a laptop.
And here are examples of scanned objects. But they all belong to the third version of the scanner. Dropbox In the model.obj file you can clearly see what happens when this rubber roller slides on the motor - the dog has three eyes. The scan was stopped, causing a cutout. All files are point clouds. You can open it using MeshLab. The models were not processed by hand. Completely raw data. From above you can see “white spots” - areas without dots. The camera doesn't see them. White spots can also be seen in other places. They appear either in areas that are too dark or when surfaces overlap. For example, in the stn_10.obj file, the goat's horns overlap each other, which is why the inner surface of the horns was not scanned.
Spinscan by Tony Buser: The Basis of All Scanners
You may be interested: Where to put the tablet in the dishwasher: instructions
In 2011, 3D printing genius Tony Buser released Spinscan. This is a homemade open source 3D scanner based on a laser and a digital camera. MakerBot later used ideas from Spinscan to create the closed-source Digitizer scanner.
“Atlas” is a developed project that requires improvements
A 3D scanner describing how it works from Murobo is currently seeking funding on Kickstarter. Like Spinscan, Digitizer and Cyclop, Atlas uses laser line modules and a webcam to scan an object on a rotating platform. Atlas replaces the Arduino Raspberry Pi to integrate control and capture into the device. Like Cyclop, the creator of Atlas promises that it will be an open source project. The $129 sets are sold out, but some remain at $149 and $209.
In 2022, the company aims to release a smartphone-based 3D scanner that will not only display background visibility, but also design the focus when capturing an image. In America, DIY innovations are amazing. If you don't know how to make a 3D scanner, use the unfinished version of Atlas. The functionality is quite clear, and developers only need to flash the device and ensure the functionality of those functions that they want to see as a result.
How to assemble a photo scanner from a smartphone and a few cheap parts
In this article, we will tell you how to independently assemble a device with minimal cost that will allow your smartphone to scan photographic films.
To assemble the scanner you will need a box the size of a smartphone, only thicker, six white LEDs, a 100 ohm resistor, a 9-volt Krona battery with a contact pad, a power button, a rectangular piece of white acrylic (or matte plastic) and glue. In addition, a smartphone is required - they are used to capture the image.
You also need tools: a drill with a drill bit, a soldering iron with rosin and solder, a file and a glue gun. You may already have many of the components - for example, LEDs can be obtained from an old flashlight or key fobs. The missing parts can be purchased at the radio market or in a specialized store.
It is better to use a plastic or metal box, since paper can get fine dust onto the film, which will be clearly visible in the scanned photograph. Place the smartphone on the box and mark on it the place where the camera is located. Drill a hole with a diameter of about 1 centimeter.
File the edges of the box so that you can insert the film into it and move the frames. Standard 35mm film requires approximately 40mm cutouts on each side.
Cut a slab of acrylic 40mm wide and the length from one edge of the box to the other. Glue it onto four posts so that the LED can fit under it and process the edges with a fine file or sandpaper so that the film does not get scratched. Make a lock on one edge of the body that will prevent the film from curling. It can be constructed from an unnecessary ruler.
Solder an electrical circuit from a battery, a switch, a resistor and LEDs according to this diagram:
The LEDs should be evenly spaced under the acrylic plate on both sides. The positive contacts should be on top and the negative contacts on the bottom.
Fill the free space under the plate with glue - this is necessary so that the light is distributed evenly. Make a hole in the housing for the switch. If everything is done correctly, you will get this glowing thing:
Put on the cover with the hole for the camera and place the smartphone on top. Launch the camera app.
It is better to use an application that can take negative photos, but you can shoot in normal mode and then invert the colors in a graphics editor. After the camera focuses, you can start scanning the film, moving frame by frame. The LomoScanner application has been released for Android and iOS, designed for scanning films in the device of the same name, but it is also suitable for a homemade scanner.
This scanner can be used with any smartphone. The scanning quality is quite high, but of course it largely depends on what kind of camera is installed in the smartphone. You shouldn’t expect decent results from a smartphone with a bad camera, but a high-quality camera, on the contrary, will allow you to achieve results comparable to an expensive scanner.
CowTech Ciclop: new multifunctional device model
The price goes up to $160 (depending on whether you 3D print parts or not). The company is based in the USA. The resolution of finished images reaches 0.5 mm. Maximum scanning volume: 200 × 200 × 205 mm. BQ formed the basis of a DIY 3D scanner kit for a 3D printer. With your own hands, you can modify the model version to create images in four-dimensional space.
CowTech Engineering leveraged funds led by BQ, bringing unique value to the updated model. New opportunities:
- environmental review,
- background capture,
- display lenses in an inverted style.
True to the open source movement, Cowtech has launched a Kickstarter campaign to raise money to put CowTech's version of the original into production. The team set a lofty goal of raising $10,000, but were met with surprise and delight when the community was able to raise $183,000. The CowTech Ciclop DIY 3D scanner kit from a camera and phone was born.
Let's start shooting
Before you start shooting, you need to place the object to be scanned on some kind of stand or secure it to a tripod. It must be firmly fixed so that the object does not move or dangle on its base. You can, for example, secure it on a stand with a piece of plasticine - and this piece should be large enough so that the object does not skew or fall on its side during shooting. It is best to install the object on a free-standing stool or table, around which you can easily walk around with the camera in your hands.
Continuation is available only to members
Option 1. Join the “Xakep.ru” community to read all materials on the site
Membership in the community during the specified period will give you access to ALL Hacker materials, allow you to download issues in PDF, disable advertising on the site and increase your personal cumulative discount! More details
So what's the difference between the CowTech version and the BQ DIY version?
CowTech Ciclop still uses Horus 3D software as it is a fantastic shop for 3D scanning objects. The differences, however, are the slightly different design that the team spent several days developing so that the parts can be 3D printed on any FDM 3D printer.
These same blanks can be used to develop your own devices. The company's 3D scanners and printers only have a small build volume, so CowTech has developed parts that can be printed on any printer with a build volume of 115 x 110 x 65 mm, which is found in almost all 3D printers.
Ciclop from CowTech:
- There are adjustable laser holders.
- CowTech DIY uses laser cutting of acrylic.
BQ Ciclop:
- Models use threaded rods.
- There is no laser cutting of acrylic.
There's nothing wrong with this and the scanners still look pretty similar, but CowTech only intended to improve on the existing design rather than reform it. CowTech sells a scan-ready Ciclop for $159 on its website. Overall this is a great cheap DIY 3D scanner that is very effective for laser triangulation 3D scanning.
The simplest 3D scanner using the example of the Sony Xperia XZ1 Compact smartphone
I share my experience of 3D scanning and printing busts (souvenirs). Until now, 3D scanners have been an expensive and inaccessible method of digitization; sometimes it is easier to draw a simple model by hand. But what if you need to create a bust or model of a real object? This is where various tricks come to the rescue in the form of digitization from photographs. But modern flagship smartphones have been integrating similar functions for a long time. This review will talk about the 3D Creator application for Sony Xperia. Hi all! Quite by accident I found out that there is a fairly good and inexpensive method for 3D scanning. Specifically, the 3D Creator application for Sony Xperia XZ1.
The 3D Creator application can be downloaded freely, but without a Sony Xperia smartphone it will be of no use. The program is a 3D model constructor that allows you to create a 3D model with relatively low detail and post-processing from a series of images from a good rear camera. I found a relatively good smartphone, the Sony Xperia XZ1 Compact, which is equipped with a laser sensor suitable for creating 3D models.
Specifications:
Brand: Sony Model: Xperia XZ1 Compact Processor: Qualcomm Snapdragon 835, GPU Adreno 540 NFC: Present OS: Android 8.0 Protection: IP65/IP68 Display: 4.6″ IPS Triluminos Display Corning Gorilla Glass 5 Screen resolution: 1280×720 Rear camera : 19 MP (wide-angle Sony G Lens optics) EIS stabilization, laser and phase detection autofocus, slo-mo super slow motion 960 frames per second.
f/2.0 aperture Sony IMX400 Motion Eye Front: 8 MP Sony IMX219PQ (ultra-wide-angle lens with a viewing angle of up to 120°) Battery: 2700 mAh with QC3.0 support Interfaces: BT 5.0, aptX HD, USB Type-C, Wi- Fi a/b/g/n/ac dual-band, 3G, 4G LTE Additional features: 3D scanning application
So, the peculiarity of this phone is a built-in laser rangefinder for autofocus, which is adapted for 3D scanning in the proprietary 3D Creator application . The scanning involves an accelerometer, a laser rangefinder and a rear camera.
There are a number of preset modes (portrait, bust, subject scanning), as well as built-in processing (elimination of noise and defects) and post-processing (rotation, cropping, etc.). The result is *.mesh and *.stl for a regular 3D printer.
The scanning result is extremely dependent on the lighting, the background (and dynamic objects in the background), the stability and accuracy of the scan itself. The result is not always satisfactory.
Built-in processing reduces noise, reduces detail and greatly blurs objects.
The scanning process is simple - select a victim object, select a background (light, monotonous; if a person is on a chair, then in an empty room or against a clean wall).
Preset modes have their own scanning patterns - focus marks, direction of movement, etc.
Strictly speaking, the scanning process itself is not complicated - you just rotate your smartphone according to the pattern, trying to maintain the radius, uniformity, etc. The more carefully you do it and the more even the lighting, the better the result. It doesn’t always work out the first time, but it is possible to “re-scan”.
The result looks creepy - the application superimposes the texture of a photograph onto the three-dimensional model. It turns out that it’s still a cabinet of curiosities.
Initially, the application was positioned as a “hype” application for creating animations and 3D collages for Instagram and other social networks. With the ability to order printing in the store. But... the application allows you to export the original *.mesh model, as well as get a ready *.stl file for printing.
When exporting, we receive an archive with scan results. File composition: *.mesh cloud of points and textures in jpg.
But there is a separate option for generating a *.stl file that can be loaded into any 3D printer slicer. The screenshot shows the result of scanning the bust. The printer offers to print it 1:1.
The result of printing on a photopolymer printer
The detailing is, of course, so-so. Suitable for painting.
Such figures are suitable, for example, as a caricature souvenir, for example, if you paint/decorate the figure, for example, with a wig.
Or “make fun” of it by coloring it a little like Halloween
The smartphone does not scan complex or small objects, for example, the thread of a bolt - there is too much noise, which is then cut out by the application. Just like it’s impossible to do high detail. The smartphone/3D Creator app is suitable for creating simple figures, busts, and commemorative models with low detail. Often the resulting models require “refinement”—removing scanning errors. Although, if you provide the conditions and “teach” your hand, then there will be fewer such mistakes. Thus, you can get a very simple (and inexpensive) 3D scanner for your hobby, the scanning itself does not require special skills or software, and the process itself is quite fast. Shooting a bust takes an average of 2-3 minutes of leisurely movement. It can be done faster if you get used to it. Printing the models on a photopolymer printer took 2 hours.
As for the application, it did not launch on my other smartphones. Editing *.mesh is also a pleasure, as is editing stl. Looking ahead, I’ll say that Samsung also has a similar application and scanner, but 3D Creator on Xperia works noticeably better. Perhaps I’ll compare these functions in the future.
Link to the application and description of 3D Creator on the official website.
Rotary machines and tables for creating scanners
This is because it is based on photogrammetry rather than laser triangulation and is compatible with your smartphone! You can download the 3D printable file to sync devices.
You can make a 3D scanner with your own hands from available materials. You just need to trust the creators of DIY 3D. A simple device that instantly turns your iPhone or Android into a 3D scanner by connecting it to this player. Then, using headphones and a phone camera, it takes more than 50 photos of the object that will be scanned as the turntable rotates.
Once you've taken these images, you can load them into a program like Autodesk ReCap to turn the photos into a full-fledged 3D file.
Overall this is a fantastic creative project and a great DIY 3D scanner for those on a budget.
Making a 3D scanner using a webcam
In order to make a homemade 3D scanner, you will need:
- high-quality webcam;
- linear laser, that is, a device that emits a laser beam (to obtain a high-quality scan, it is better that the beam be as thin as possible);
- various fastenings, including an angle for calibration;
- special software for processing scanned images and data.
Please note that without the appropriate software you will not be able to create a digital model of objects and objects. Therefore, initially take care of the availability of special programs. For example, DAVID laser scanner and TriAngles are considered basic, but they require the use of a rotating surface.
Start with the calibration angle. To create it, print a template (it is included with the program). Place it so that it creates a 90 degree angle. It is important that the correct scale is maintained during printing. To do this, use a calibration scale. The camera is calibrated automatically or manually; this is also provided by the software.
To scan an item, you will need to place it in the calibration corner, and install a webcam opposite it. It is important to place the object exactly in the center of the image on the screen. In the webcam settings you need to disable all automatic adjustments. They also help set the color of the laser beam. By pressing “Start”, smooth movements are made. The beam needs to circle the object from all sides. This will be the first scan cycle. In the future, it is necessary to change the position of the laser in order to cover all points that were not previously processed.
Upon completion of all processes, scanning stops and the “3D display” mode is selected in the program. If you don't have a laser on hand, you can replace it with a bright light source. It will ensure the projection of the shadow line. However, in this case, change the settings in the program that will correspond to these parameters.
Microsoft Kinect 3D scanner
It costs even less at just $99 (but is no longer on sale, although the Kinect V2 is still available with Xbox One). Kinect slogan" and surprise your friends.
While Microsoft has responded to demand by creating its own 3D Scan app for the Kinect scanner, there are a number of third-party options that may be preferable. These include:
- Skanect, made by Occupital, which also sells the structure sensor.
- ReconstructMe. It provides a set of tools that allow you to perform 3D scanning for less than $100.
You may be interested in: How to measure the diagonal of a TV: basic methods
The results are not fantastic, but for the price they are quite acceptable. It has been shown to be inferior to traditional protogrammetry options in terms of quality, especially in small details such as small models such as shark teeth. However, for 3D scanner beginners, this is a fantastic entry-level product, especially since you may already have one for the Xbox 360.
Making a 3D scanner from a game console
Xbox One is a console that is already equipped with a second generation Kinect and can be used as a 3D scanner. If you have a regular game controller, then you can make a 3D scanner from kinect using the following programs:
- Kinect Fusion. Creates highly detailed models by reading data from Kinect sensors.
- Skanect. With its help, 3D images of rooms with all the objects that are in them are created. To create a three-dimensional model of the surrounding space, you simply need to rotate the device around you. In order to detail individual objects, it is necessary to point the camera at them again.